Showing posts with label dinner. Show all posts

May 19, 2011

Easy Creamy Chicken Piccata

My brother-in-law made this dish for me when I stayed with them. He's taught me a few other dishes so it's fitting that I call him Chef Alcaraz. So, what makes this dish?  Definitely the crispy crust and the oh my, oh my, the lemon-y butter-y sauce goodness. This is the type of sauce that you want to pour over everything you have on your plate - broccoli, rice, pasta, whatever. Trust me, it will taste better with this sauce.

Chef Alcaraz made it with chicken breast but I used what I had in my freezer - boneless chicken thighs and it was just as good. I changed it up by using panko crumbs to give it a crunchier bite to the dish and of course, I used cream. Like this sauce, cream makes everything better, smoother and silkier. 

A key thing to note for this is that you should cook your meat on medium heat, not high. If you cook on high, your meat will cook on the outside too fast and start burning before the middle is cooked. When you realize how easy this dish is to make, you'll cringe a little that you've ever spent the $10 plus dollars on this same dish in a restaurant. 

Creamy Chicken Piccata
Adapted from this recipe
Serves 4

4 boneless chicken thighs
1/2 cup flour
1/2 cup panko crumbs
1/2 cup chicken stock
1/3 cup capers
3 tbsp butter
3 tbsp olive oil
1/3 cup cream
1/3 cup fresh lemon juice
Zest from one lemon
Handful of chopped parsley

1. On a clean plate, put the flour and panko crumbs.  Make sure your chicken thighs are washed and thoroughly dried with paper towels. If you find that your thighs vary signficantly in thickness, flatten them out between two sheets of plastic wrap or wax paper.  This helps ensure your meat cooks evenly.

2. Take the dry chicken and evenly coat each piece. 
3. In a pan on medium, heat up the olive oil and 2 tbsp of butter.
4. Cook one side of the chicken for about 5-6 minutes.  Flip the chicken and cook for another 5-6 minutes until crispy and golden brown.

5. Remove the chicken from the pan. There should be plenty of butter and chicken bits left.  If not, you can add in a few extra tbsp of butter or you can do what I do and add in cream. :) Add in the lemon juice, zest, stock and capers. 

6. Once the liquids blend together and you have scraped up the bits of chicken and incorporated into the sauce, add the chicken back into the pan and add in one final tbsp of butter.
7. Remove to serving platter, making sure to add all the sauce and sprinkle the top with chopped parsley.  This is best served with linguine with simple herbs, S&P and olive oil - and even better when you add some of this sauce!  I had leftover rice and that worked well too.

December 13, 2010

Chicken Wrapped in Proscuitto

I am particular with my Food Network shows and cooks, and unfortunately, Rachael Ray, is a victim of the pass by click of the remote control.  I'm sure her dishes are fantastic, but I just can't sit through an entire episode.  I'm also not going to into why. =)  Regardless, this is one of her recipes that I found online and it turned out pretty well.  It could use a few more tweaks but still pretty tasty for a first time recipe.

I have an abundance of rosemary and need to find ways to use it before the cold (whenever it comes in Houston) takes it away.  Holy, the many uses for rosemary.  I've used it with steak, with butternut squash, with chicken, with salad dressing, and on and on.  This dish combines the best of three things I'm loving - chicken thighs (hooray! for dark meat), rosemary and proscuitto (hooray! for proscuitto). 
  
I also made this for Hilda and Eric but cooked by quickly searing and then popping in the oven.  I don't think I have a preference on using the pan vs. oven.  I probably prefer to just use one so not to have to hassle with both.  Both tasted similar.  Again, I'll probably tweak this the next time I make it - use orange zest and juice instead of the olive oil, use different herbs (probably just as good with fresh thyme or oregano which I have now thanks to my friend Liz! Look at that trio of fresh herbs!), who knows, so many different ways to tweak! 

Chicken Wrapped in Proscuitto
Recipe adapted from Rachael Ray

4 chicken thighs, boneless
8 sprigs of rosemary (half minced and half whole leaves)
5 garlic cloves, half minced, halfed sliced
4 slices of proscuitto
1 lemon (zest and juice)
1/8 cup of olive oil
1/4 cup chicken broth (you may need more based on your preference)
Dash of dried oregano
Dash of garlic powder
S&P

1. Make sure to wash and dry the chicken thighs. Cut off those excess fat pockets on the thighs. S&P each of the thighs.

2. In a bowl large enough to hold the all the chicken, pour the olive oil, minced garlic and sliced garlic, minced rosemary, oregano, garlic powder, lemon zest and juice. Mix well, add the chicken and coat each side of the thighs.  Let this sit for about 15 minutes.
3. Take the proscuitto out and lay each of the four slices on a board. Take a thigh and put a bunch of rosemary leaves, garlic slices in the middle, wrap up in a roll (as much as you can), and wrap the proscuitto around it.  4. In a medium high pan, sear each side of the chicken.  Don't worry if the middle is not cooked, you just want that crispy proscuitto.  Once seared, add in the chicken broth and cover the pan.  Let it steam cook until done.  

August 30, 2010

Baked Lemon & Thyme Chicken

While shopping at the amazement that is Costco, I tend to get sucked into the book section as well and that day, found an Ina Garten Back to Basics cookbook.  Hooray!  Since I'm already going to spend $100 bucks at Costco (why is it that you can NEVER leave Costco without spending at least $100?), what's one book?  It seems that convincing yourself to buy more things when you're already spending a lot is pretty easy....

I've tried this two ways - baked in the oven and also on the grill.  I prefer cooking in the oven since the meat is a little more tender, moist and juicy.  Grilling seemed to make the chicken a tad too dry and didn't hold the flavor as well since you are not grilling directly in the juices. 

I suggest marinating this the night before in a plastic bag or in the baking dish so when you get come, preheat the oven and then just put in the dish.  So easy.

Also, notice those green beans in that top picture?  From my daddy's garden!  He's the only one in this family with a green thumb.  I usually get a bag of fresh green beans every time my folks come over = very spoiled.  Clean, snap and cook in oil with garlice, salt and pepper - so good and love the crunch too.

Baked Lemon & Thyme Chicken
Adapted recipe by Ina Garten

4 chicken leg and thigh (bone-in)
6 sprigs of thyme and chopped
2 tspn of salt
2 tspn of pepper
4 lemons (zest of 2 and juice from four)
1/3 cup of good olive oil
5 garlic cloves, peeled and chopped

1. Take the thyme and roughly chopped.  Do the same with the garlic.  Add both to a baking dish large enough to fit the chicken. 
3. Clean the lemons and zest two directly into the baking dish.  Squeeze juice from all four.  Add S&P and the olive oil.  Give it a good mix.  Do a quick taste test - and add more lemon juice or S&P as ncessary.  
4. Rinse and pat dry the chicken.  Add to the baking dish, moosh around and then turn over the chicken.  Cover tightly and let it sit in the fridge for at least 4 hours.  I highly recommend doing this the night before and the next morning, turn over the chicken before heading into work. 
5.  In a 420 degree oven, cook chicken for approximately 20-25 minutes.  Halfway through the cooking process, I like to scoop the juices over the top.  When time is up, insert a fork and make sure it's cooked through.  Serve with a side of veggies and rice!

July 04, 2010

Seafood Shrimp Marinara Pasta

First of all, sorry for the lack of pictures in this post. I made this dish on a night where I didn't have a dish planned, which meant it was a night to cook whatever I had in the fridge, pantry and hope it was edible. This night it was shrimp, spinach and canned tomatoes. WELL. This turned out so fantastic that I rushed to take a picture of the end product before eating.

Several week ago, I bought these large shrimp with their head on in the asian grocery. I love shrimp but especially love shrimp that still have their head on.  The shrimp meat itself doesn't burst with a ton of flavor but with the head, ack, SO much more  - which is perfect to add that big punch of seafood flavoring to soups, sauces, etc.

I know it's hard to find shrimp with their head still on in the normal grocery stores - my Kroger doesn't have - so if you venture out to the chinatown or fiesta in your area, just buy 1 or 2 lbs if they look fresh.  It doesn't hurt that they are usually cheaper there too!  (These huge shrimp were only 6.99/lb - steal!)  When I get home, I like to portion them into individual sandwich/ziploc bags to freeze so you dont have to defrost your entire bag of shrimp when you only need a few.  For the ones used in this dish, I put 6 shrimp per bag.  When you need them, take them out 30 minutes prior to cooking and put in sink with water to help them defrost completely. 

Shrimp Marinara Pasta
Serves 3-4

1 lb spaghetti or linguine
6 large shrimp head-on
2 tbsp butter
32 oz can of tomatoes whole
1 can of tomato paste
1 tsp sugar
1 tsp dried basil
1 tsp dried oregano
2 small balls of mozarella, chopped into small cubes
1 cup spinach
1/4 cup grated parmessan
fresh basil chopped
S&P

1. Make sure to wash and clean your shrimp as well as the spinach.  Bring a big pot of water with a big pinch of salt to boil and cook the pasta.

2. In another saucepan, melt the butter and then add in the can of tomatoes and tomato paste.  Stir the sauce to make sure the paste is spread out and incorporated with the sauce.  I let it cook on medium heat for a good 5-10 minutes.  Then I crush the tomatoes with my wooden spoon so that you get nice big chunks of tomatoes.  I'm sure you can add fresh tomatoes instead but I used what I had! 

3. Add in the sugar, pinch of S&P, dried basil and dried oregano. Give it a taste and add more of any of the above as needed.  Let it cook for another 2 minutes so flavors start incorporating.

4. Next, add in the shrimp make sure they are immersed in the sauce, cover and let it sit for a good 4-5 minutes.  This is where the magic happens.  The juice and flavors from the shrimp heads seeps into the sauce and gives you that great seafood sauce.  Check the shrimp depending on  how big they are - they may need shorter or longer time to cook.

5. Take this off the heat and immediately pour into your big pasta serving bowl and add in the mozarella and spinach.  You need to do this quick so that the cheese and spinach melt and cook from the heat of the sauce.  Next, add in your drained, cooked pasta and give it a good mix. 

5. Last, top with the shredded parmesan and fresh chopped basil.

May 12, 2010

Chicken Curry Pioneer Style

I follow a number of blogs that talk design, fashion, food, cooking, photography or pets.  I was recently introduced to Pioneer Woman, laughed out loud reading the most recent post and then ended up reading her archived blog posts for the next 30 minutes.  To shed light on her killer following, some of her posts will have 20,000+ comments.  She has several sections including confessions, cooking, home & garden, and photography.  Hello, sister!  That's my blog roll all in one.  I purposely don't read her blog every day so that when I do, I'll have several posts to catch up on.  I don't know why that gives me that little extra pleasure but it simply does.  Ha! 

Anyways, if you haven't read her blog, you need to.  She has this hilarious sense of humor and she couples everything with photos.  Two of my favorite posts include the one about Charlie and the one about her college handbook for her sister.    

She has a new cookbook as well, which will probably be on my next bookstore run.  On her blog, she featured an easy chicken curry recipe from her friend, Tom.  It definitely was easy!  I actually loved the flavor, extra punch and depth provided by the onions, tomatoes and garlic.  This was so good that my mom asked for the recipe and even made it herself!  What was even better, this was a one pot dinner. 

Beware, if you don't have a good kitchen ventilation system, your house and everything else - including your pets - will smell oh so, curry.  Don't think that it will only last a few days.  Nope, I had a curry smell in my house for a week and even after that was gone, my Sasha smelled like curry for two more weeks.  Poor girl. 

One Pot Chicken Curry
Recipe adapted from Pioneer Woman
Serves 4

6 chicken thighs
1 tsp mustard
1 onion, chopped and separate into two equal portions
2 tomatos, chopped
8 cloves garlic, chopped
Handful of cilantro, chopped
3 tbsp yellow curry powder
1 3/4 cup water
1 cup chicken stock
4 tbsp veg. oil
S&P

1. Wash and pat dry chicken thighs. Put in a large bowl and sprinkle with S&P.  Then add in the mustard and mix well.  Chopped up the garlic, tomato, 1/2 onion and cilantro.  Add to the bowl and mix around so that the chicken is thoroughly mixed and covered.  I let it sit in the fridge for an hour.

2. If you want to serve this with rice, would start cooking the rice now.

3. In a small bowl, combine the water and curry powder and mix well.  In a pan on medium high heat, add the veg. oil and the curry water mixture.  Once mixture has reduced down slightly, add in the other 1/2 onion and let them cook for about 3-5 minutes.  If it gets to be too dry, add in a little bit of water.  
4. Now add in the chicken along with the marinade mixture.  I put all the chicken in and then flip each one to make sure each side is coated with the curry mixture.  I let it sit and cook for about 5 minutes covered.
5. Flip the chicken again if you need.  Now add in 1 cup of water and 1 cup of chicken stock.  I let it cook covered for another 15-20 minutes until the chicken is cooked through.  Halfway through, I spooned the sauce over the tops of all the chicken. 
6. Cut through a chicken to make sure it's cooked all the way.  Then server with hot rice with a big spoonful of the sauce (for the chicken AND the rice).  Enjoy!

March 10, 2010

Sorta Lemon-y Chicken

You all know I love my dark chicken and the many different ways to cook and eat them. This dish is fairly simple but make sure you have a good ventilation system in your kitchen.  I was scrambling to open up my windows to make sure my smoke alarm didn't go off!  Or, I think this is a clear sign I need to invest in some more corningware or even a dutch oven - hooray!

This dish can be served with a slew of sides.  Best with some steamed carrots, cauliflower or green beans - all of which I had none.... Sigh.  So my staple of plain white rice it was! 

I'd adjust a few things on this recipe. First, I'd actually squeeze in lemon juice and the zest of one or two lemons. I mean, this dish is called lemon chicken and if that citrus bang doesn't hit or even nudge you when you take that first bite, might as well just be called baked chicken.  So flavor was a little too faint and its probably attributed to the overwhelming power that is called soy sauce.  So less soy sauce, more lemon and more honey to balance the more lemon.

Lemony Chicken
Serves 2
Recipe adapted from Cook, Eat, Love

Four chicken thighs
1/3 cup hot water (or chicken stock)
Splash of olive oil
3 cloves of garlic, roughly chopped
Fresh thyme, pull off from about 4 or 5 sprigs and give a rough chop to release aroma
Splash of sherry vinegar
1 1/2 tbsp soy sauce
5 tbsp honey
1 lemon, finely sliced
1 juice and zest of one lemon (Extra that I would add)
S&P

1. Wash and then thoroughly pat dry your chicken.  Combine the S&P, garlic and thyme in a bowl. Then sprinkle this on the chicken - stick some under the skin as well. Do not take the skin off.  This will help when you brown the chicken and add flavor to the sauce. 
2. Heat some olive oil in a pot and brown the chicken so you get a nice browning on both sides. This is where my kitchen started to smoke!  Can you see from the below picture? Make sure you turn the vent on high or have some windows open.  Ha!
3. Once brown, add the vinegar and let it quickly bubble and reduce by half.  Then add in the soy sauce and honey (I mixed my soy sauce and honey together first before adding).  Make sure this mixes well with the vinegard and move around your chicken so they are nicely distributed and coated.  I like to flip my chicken a few times to make sure.

4. Add 1/2 cup of hot water (or chicken stock) and add the lemon slices (make sure you wash and dry the lemon before slicing.  Who wants dirty lemon slices in their food!). This is where I would add in the juice and zest of one lemon. Turn your heat to medium, let it bubble and reduce. This should take 5-10 minutes.
5. Take off heat and then serve immediately with fresh veggies or rice. Make sure to spoon some of the sauce on the chicken and the rice.

Side note: Cleaning this pot is no bueno.  I highly suggest you take the chicken out, serve with sauce and then immediately soak the pot in warm water while you are happily eating your meal.

January 29, 2010

"So good I Wish My Mouth Was Bigger" Dad's Special Fried Rice

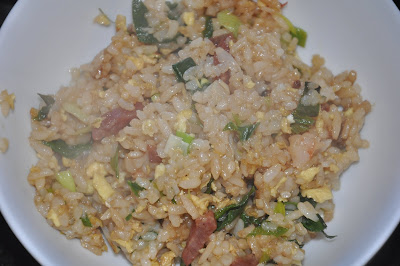
Ahhhhh, everyone dies over my dad's special fried rice. Seriously, no one makes it like him. He's got some special leprechaun skill that makes everyone go a tad ridiculous over his fried rice. When I say tad ridiculous, I mean folks get very excited, gather in the kitchen and watch his every move - just waiting until he exclaims - let's eat! And we can't eat just one or two bowls...no, we got back for thirds and usually, the entire pot is gone. Case in point - Ross. Dad left him an entire pan for him to eat the next few days and a few weeks later, I found out that he actually ate the entire thing in one sitting.... I know its Ross but still, this stuff is like crack and is just that good. I can probably eat about three bowls of this stuff myself. So, what's so special about it?
He uses a special veggie - garlic onion/leek. These are not green scallions. I've only ever seen this in asian grocery stores and only in the winter time. Here's a picture of what these suckers look like. They are thicker than normal leeks and green scallions and the bulbs are much firmer with a slight purple hue through it. The stalk is thicker and more flavorful.
So this awesomeness is also by the process of how he cooks it. Beware, I've tried to emulate his process and really, can't get it the same as him. Like I said, he's got a secret leprechaun skill that no one else has. Here's my super cute dad cooking lunch for us!
Dad's Special Fried Rice
need: a small bowl for soy sauce, plate for eggs/sausage after initial cook, large pot/pan to cook the rice
4 cups of rice (better if it's a day old)
*Also, when I say 4 cups, it's the chinese cup that you use to measure your uncooked rice before you put in the rice cooker. I think this comes out to a lot more rice when cooked....
4 eggs beaten
2 or 3 links of chinese sausage (you can omit this if you don't want meat but this flavor adds quite a bit to the dish)
3 stalks of garlic onion/leek (cut the white section into diagonal slices roughly 1/8 inch thick and the green section into 1/2 inch length)
1/2 lb of shrimp cut into small pieces (so each shrimp, cut into three pieces)
S&P
Soy sauce (amount really depends on how salty you like. I prefer adding more soy sauce versus salt)
Canola/Veg oil (do not use olive oil)
1. Cook your rice if you don't have rice from yesterday. If from yesterday, warm in microwave for roughly 3 minutes. Using a spoon, mix up the rice so it's not in big chunks.
2. Heat up a large ot and add some oil. Beat your eggs and quickly scramble them in the pot. *If you have green scallions, you can add them here too if you'd like. Take out the egg and put on a plate for use later.
3. In the same pot, cook the chinese sausage until almost done. Again, take it out and put on the same plate as the eggs.
4. Cook the shrimp next until almost done. Take out and add to egg and sausage plate.

5. Add some more oil into the pot and add in the garlic onion/leeks and cook until very fragrant. Make sure to stir constantly. Add some salt to the leeks.
7. Add the warm rice to the leeks and mix to incorporate well.

8. Add in the eggs, sausage and shrimp. Mix well. (Note, you can always add other veggies or meat. Just do the same process of cooking each separately and then incorporating everything in the end)
9. Pour soy sauce into a bowl and then drizzle the soy sauce over the rice. This helps you control how much you put into the rice. Add some, taste and then add more if you liek. Also add in a dash of salt (if needed) and lots of pepper. Make sure to taste everytime you add more.
10. Let it cook for a little more. I like when the rice at the bottom of the pot gets a little crunchy :)
11. Done! Serve and make sure you have enough for seconds, thirds....

January 05, 2010

Butternut Squash & Sage Risotto

I love carbs. I love rice. I love cheese. I like squash. Naturally, I love risotto. I love the creamy texture, the varying flavors and all the different ways it can be prepared. One of my favorite risotto places is Piccos in Sausalito where they make fresh risotto every 20 minutes! Delish. My second favorite is the lobster risotto from Tonys. That dish is the single reason this restaurant is in my top 3 fav restaurants in Houston.

This was the first real meal I made in my new house and kitchen. Yippeee! This isn't an incredibly simple dish though - required lots of time stirring and standing over the stove and it also takes up several pots and utensils. I hate cleaning dishes so recipes with the fewer pots and pans always get an extra star. Ingredient wise, this was a good start with butternut squash. I'd like to venture out and make one with various type of mushrooms and ultimately, lobster risotto. Probably won't be as good as Tonys but you never know.

I served this with a brussel sprout and proscuitto side.

Butternut Squash Risotto
Serves 6 to 8 (Need: 2 medium sized pots and 1 small pot)
1 medium butternut squash, peeled and cubed
10 sage leaves (5 whole, 3 chopped and 2 sliced)
S&P
4 cups chicken stock
1/2 onion diced into small cubes
2 shallots diced into small cubes
3 tbsp butter
1 cup Arborio rice
1/4 cup dry white wine
Finely grated Parmesan cheese

1. Peel, cube and clean the butternut squash. Put in small pot with 5 whole sage leaves and 1 cup chicken stock. Put on medium heat and let it cook until squash is tender - roughly 10 minutes.
2. In a medium pot, put the rest of the chicken stock and 1 cup of water. Bring to a boil. Once boiling, put it on medium to low to keep it hot.

3. While squash is cooking, put the onion, shallots and chopped saged into a hot pan with 2 tbpn of butter. Cook until onions are almos clear. Add the rice, dash of salt and let it cook for a few more minutes. Then add in the wine and once it is almost absorbed, turn the heat down to medium. Make sure to continually stir the rice so the rice does not burn.
4. Start ladling one large scoop of hot chicken stock (or more) to just cover the rice. Stir and let the rice absorb the liquid. Continue this process one ladle at a time until the rice is cooked. If your rice is still not cooked and you are running low on stock, you can add hot water to the stock. 5. Check the squash pot. Once cooked, I also took the squash broth and added to the hot pot of broth for the rice. 6. Once rice is done, turn off heat and add 1 tbsp of butter, sliced sage leaves and parmesan cheese. Give it a good quick mix to incorporate and serve!

December 06, 2009

Sun Dried Tomato Pasta

Hallo! I am back after a hectic month and oh, how I’ve missed cooking and enjoying dinner at home. With a crazy work launch, moving (woot!) and my sister’s wedding, November was a very good but busy five weeks. Dinners for the past month have consisted of quick & microwaveable meals, pasta from the can (I know, for shame..), dumplings that just need a quick boil or simple takeout.

You can probably tell from my posts that pasta is one of my favorite dishes. Why? Because you can do SO many different things with it. Make it healthy with a light toss of salt, pepper, herbs, veggies and olive oil, toss in a little a tomato sauce, make it taste even better with a few tad weee spoonfuls of cream or have it with protein or seafood. So many ways, I die. I found this recipe from one of my favorite blogs, The Kitchen, which incorporates recipes from a myriad of sources, latest kitchen styles, kitchen/cooking goodies and information about food you may never have heard of. I just love it. I was attracted to the sun dried tomato (which I love when I have in restaurants but never really used or cooked with it myself), basil and of course, cream. This was simple but incorporated very few ingredients that are each packed with flavor so just adding a few things together make a pretty awesome dish. I varied the recipe in how I cooked them but I’ll list both ways below.

As the Mantis said in Kung Fu Panda, “This is so good, I wish my mouth was bigger!” Enjoy.


Sun-Dried Tomato Pasta (adapted slightly from the Kitchen)
(Serves 4) Need: Small food processor, pan for sauce & one large pot to boil spaghetti

5 cloves garlic
3 tbs of fresh basil leaves
1 packed cup sun-dried tomatoes in olive oil, drained (I made this recipe again and actually used sun dried tomato puree & spread that was also in the same section of the grocery)
1 tbs olive oil
1 cup milk
1/2 cup cream
1 tsp hot red pepper flakes (I omitted this)
½ cup parmesan cheese
1 lb. fettuccine or linguine or enough to feed 4 people (there’s a lot of sauce and I tend to like a lighter sauce on pasta)1. Boil and cook to al dente the pasta according to package directions. Put the sun dried tomato, basil and 4 garlic cloves in the food processor. Blend until lightly chunky as the below picture. (The Kitchen recipe only processed the tomatoes and manually minced and chiffonaded the basil. I liked forcing all the flavors to combine first in the processor).2. Heat a pan, put a splash of olive oil and mince the last garlic clove. Add the minced garlic clove until your kitchen gets that yummy roasted garlic smell. Add the sun dried tomato mixture and lightly cook on medium heat for a few minutes.
3. Add the milk and cream and lower the heat. Cook it for a good 7-10 minutes until it thickens a bit and cooks. (You can add in red pepper flakes here if you’d like). Taste and add salt and pepper if needed. (The sun dried tomato mixture is already pretty salty so I just added a pinch of pepper.)
4. Once pasta is al dente, add directly to the pan. Turn off heat and quickly mix the pasta with the mixture. If you need to add some pasta water you can. Last, I tossed in a handful of parmesan cheese to top it off. 5. Serve and enjoy! I served this with a light zucchini salad tossed with a lemon vinaigrette.