Showing posts with label pasta. Show all posts

October 22, 2011

Vodka Pasta

Vodka pasta always seems like a treat when I go to an Italian restaurant, not thinking I can make it at home. I have tried Ina's vodka pasta recipe and while it turned out well, I was put-off by the complexity of the recipe and the 3 hour cooking time. This basic vodka sauce is from Giada and more importantly, is easy and quick - about 45 min to an hour. 

Vodka Pasta with Cherry Tomatoes
Adapted from Giada

6 garlic cloves (peeled and chopped)
1 large shallot, chopped (or two smaller shallots)
2 tbsp butter
1 tbsp dried thyme
1 tbsp dried oregano
2 cans of whole tomatoes
1 small can of tomato paste
1/2 cup cream
1/2 cup vodka
1/2 cup Parmesan
1 tsp sugar (more based on your taste)
Garlic powder
S&P
Cherry tomatoes, cut in half (amount is based on what you prefer)
Cooked pasta (Penne and bowtie work well here)

1. In a cold pot, put the chopped garlic, chopped shallots, butter and dried herbs. Turn on the heat to medium high and let it cook down until the shallots start to get a little glazed.
2. Add in the whole tomatoes. I use my wooden spoon and smoosh the tomatoes into large chunks. I like to let this sit for about 5 minutes so the flavors start mixing together. Take a quick taste for flavor. Add in additional dried herbs if you need to.
3. Pour in the vodka.
4. Add in a can of tomato paste. Bring to a boil and then turn down the heat to medium low and let it cook for 10-15 minutes for the vodka to incorporate well.
5. Now the tasting/testing begins. I add in a tsp of sugar to bring out the flavor of the tomato and a quick dash of garlic powder. Take a quick taste and add in additional sugar, salt and/or pepper.
6. Add in the cream. You can probably omit this step if you prefer, but why?
7. Last, add in the parmesan and your vodka sauce is done!
8. Using a mix of bowtie and penne pasta (so the sauce sticks better and gets into those nooks), I add that to a large medium hot pan with olive oil and additional garlic. I add the cherry tomatoes and give it a give stir to warm through.
9. Add a few large spoonfuls of sauce on top and incorporate well.  Turn off the heat and if you'd like, add additional cheese. Serve with some roasted chicken and veggies! 

August 23, 2011

Creamy Chicken Pesto Pasta

When you have that one tomato left in the fridge or some rotisserie chicken leftovers, this is the easiest dish to make - granted, not the healthiest but easy and satisfying. Pesto is a staple in my fridge and with my abundance of basil in my garden, I like to make pesto every couple months to replenish my stock. You can keep pesto in the freezer in a tight container with plastic wrap touching the pesto and then the lid over that. It should keep for a month/two months max. I don't even let this defrost when I need it. I just take a few spoonfuls and put it directly into my hot sauce/pan, and it tastes pretty great every time. 

Creamy Pesto Pasta with Chicken and Tomatoes
Serves 2-3
1/2 cup heavy cream
3 tbsp butter
4 large spoonfuls of pesto (approximately 4-5 tbspn but really to your taste)
1 tomato chopped
Shredded chicken (I had leftover rotisserie chicken that I shredded)
Grated Parmesan cheese 
4-6 basil leaves, sliced into slivers (optional)

1. Bring large pot of water with good heaping of salt to a boil.  Toss in some pasta - I like ones that have holes/shells to scoop up the sauce - and let it cook for 8-10 minutes or via box directions.  

2. In a saucepan, heat up the heavy cream and the butter. Bring this to a boil and then once boiling, turn heat down to medium.
 
3. Take 4 large spoonfuls of pesto and add to the heavy cream mixture. Add more/less for your preference on how 'pesto-y' you'd like your sauce. Mix well and let it cook on medium for a 2-3 minutes to let the pesto incorporate and get all happy with the cream.  Add S&P if you need to - I did not. Your pesto may already be well seasoned so make sure to keep tasting!

4. Roughly chop up your tomato (or whatever fresh veggies you may have) and shred the chicken. You can certainly omit the chicken and add more veggies - broccoli or even spinach would be good in this dish.  
5. Drain your pasta (save some of the water if you'd like to add to the pasta if its too dry/thick) and put into the serving bowl. 
6. Now, mix everything together!  For the pesto sauce, don't add all at once but by large spoonfuls until it meets your preference.  Some freshly grated Parmesan cheese and some slivers of fresh basil on top - done!

February 24, 2011

Sun Dried Tomato Pasta with Shrimp

This was recommended by one of my favorite ladies, Liz. It was a very simple recipe yet very delicious with the added cream. And honestly, who doesn't enjoy a good pasta that takes 20 minutes max to make and seems like you spent way more time? Even better, I bought an enormouse container of sun dried tomatos at Costco and this was a perfect recipe to make sure you really tasted the flavors.


The original recipe is from Giadda and I made something very similar to this in the last year but it definitely needed an extra kick. I bumped it up with a little more with the cream, shrimp and I also altered the amount of ingreditents and seasoning. I was tempted to add my Tony's seasoning but I resisted!


Also, sorry for the lack of pictures. I was a tad too busy preparing dinner and only remembered to snap a picture at the very end. Also, this pasta is best consumed the day you make it. The next day I had it, it became a tad too dry and while you can add a little more cream to get it back to that silky consistency, I felt too guilty for adding more cream....


Enjoy! I'll definitely make this again.

Sun Dried Tomato Pasta with Shrimp
Serves 6
Recipe adapted from Giadda

8-10 shrimp, peeled and deveined
1 box of small pasta (pick something that can hold the yummy sauce like orecchiette)
6 cloves of garlic, peeled
3/4 cup sun dried tomato
1/4 cup olive oil
1/2 cup grated parmesan
dash of garlic powder
1/2 cup heavy cream
dash of dried basil
S&P


1. Preheat oven to 400 degrees. Quickly toss shrimp with a little bit of olive oil, garlic powder and S&P. Place on baking sheet and cook for 8 minutes or until pink and opaque. Boil water and cook pasta according to box.


2. Using a chopper, quickly blend the sun dried tomatoes, garlic, oil and 1/2 of the parmesan cheese. Heat a pan big enough to hold the pasta and put the pesto mixture into the pan on medium high. Let it cook and you'll start smelling the yummy garlic.

3. Add the cream and incorporate well. Take a quick taste and add necessary S&P. I didn't have fresh basil so I added in dash of dried basil and garlic powder here. Add in the shrimp.

4. Drain pasta and put directly into the sauce pan. Incorporate well. Sprinkle well with the other half of parmesan cheese. Serve immediately!

February 06, 2011

Basil Pesto Pasta

My first experience with making pesto was some sort of a disaster and hungry disappointment.  I didn't have enough basil, was using a blender and ran out of olive oil, and this sadly kept me from making it again.  My second time was a great success, and I'm happy to say, yes, I can make pesto!

Very simple recipe, took only a few minutes and the majority of cooking time was waiting for the pasta water to boil and pasta to cook!  We had this with steaks and it was a delicious combination. Although, not a perfect as steak and corn on the cobb... 

Pesto Pasta
Serves a Gazillon. I have a pint of pest left in the freezer

8 cloves of garlic, peeled
1/4 cup pine nuts
1 cup olive oil
4 cups fresh basil
1/2 cup parmesan (cut into cubes)
S&P

1. Have a large pot of boiling water, add a handful of salt and olive oil.  Add in the bowtie pasta and cook until done.

2. Put the basil leaves, garlic, and pine nuts into a food processor.  Let it run until it's a chunky pebbly mixture.  Add in the parmesan cheese.  When combined and with the processor running, slowly pour in the olive oil until it becomes a smooth mixture.  Add a dash of salt and pepper to taste.  Done!  Can you believe?  (Seriously, the longest part of this process is peeling the darn garlic and washing the basil!)

3. Pour the pesto sauce over the pasta and mix.  Add in freshly grated parmesan cheese and enjoy!  Oh, even better, have it with a nice ribeye steak =). 

January 09, 2011

The Good of Gnocchi

I love pasta, and of course, also love these little balls of springy, fluffy potatoes. The gnocchi at Maggiano's with simple tomato sauce is one of those consistent dishes that is perfect every time you have it, and every few months, you recall those mooments of popping one of the sauce covered potato fluffs into you mouth and you want some immediately. I don't crave pasta from a restaurant very often but this dish I do. 

The very first time I found gnocchi at the store, I got a little giddy, bought additional ingredients to make a good sauce, and of course, forgot what I needed from the store and left without completing my list because all I could think about was GNOCCHI.  Bleh, what a disappointment!  Nothing is better than the restaurant but it wasn't even close. Maybe it was the high expectation set of finding this in the store and thinking this must be good. 

During my holiday stay at my sister's house, we didn't have anything planned for dinner, and I was looking through one of the many food blogs I read.  We saw a post on homemade gnocchi and it looked so easy and even better - only four ingredients, all of which we had leftover from Christmas dinner.  First mistake - don't think just because there are few ingredients, that this isn't labor intensive or time consuming, because it is. In my case, about 45 minutes longer than I thought!

They were good but not as good as I had hoped. The gnocchi itself lacked a little flavor, and next time, I will bump it up with some additional seasoning and maybe fresh herbs rolled into the dough. Also, I overcooked the gnocchi. There's no time limit on how long they cook before they are done. Many blogs will say, the gnocchi tells you when they are ready - they float to the top.  I put the first few in, turned around to get more and when I was about to put more into the water, the first ones I put in were already floating!  Seriously, can it really be ready in less than a minute?  I didn't think so and left them to cook much longer, and ultimately, took out that chewy, springiness that is the good of gnocchi.  That said, I think I will be venturing on a gnocchi adventure and try out several versions over the next few months. 

Homemade Gnocchi
Serves 8-10 (I froze half and cooked half to serve 5)
Recipe adapted from Bitchcamero

For the gnocchi:
4 potatoes, boiled with skin on for about 45 minutes
2 large eggs
1 tsp salt
2.5-3 cups cake flour

For the sauce:
1 jar of marinara sauce
3 cloves garlic, minced
1 tsp of sugar
1-2 tsp of garlic powder
1-2 tsp of dried oregano
S&P
Grated parmesan cheese

1. After you take out the potatoes, you can easily peel off the skin with a fork. Then, you can use your fork and fluff them into pieces.  Don't mash is what bitchencamero suggests since you want that extra "fluff." 
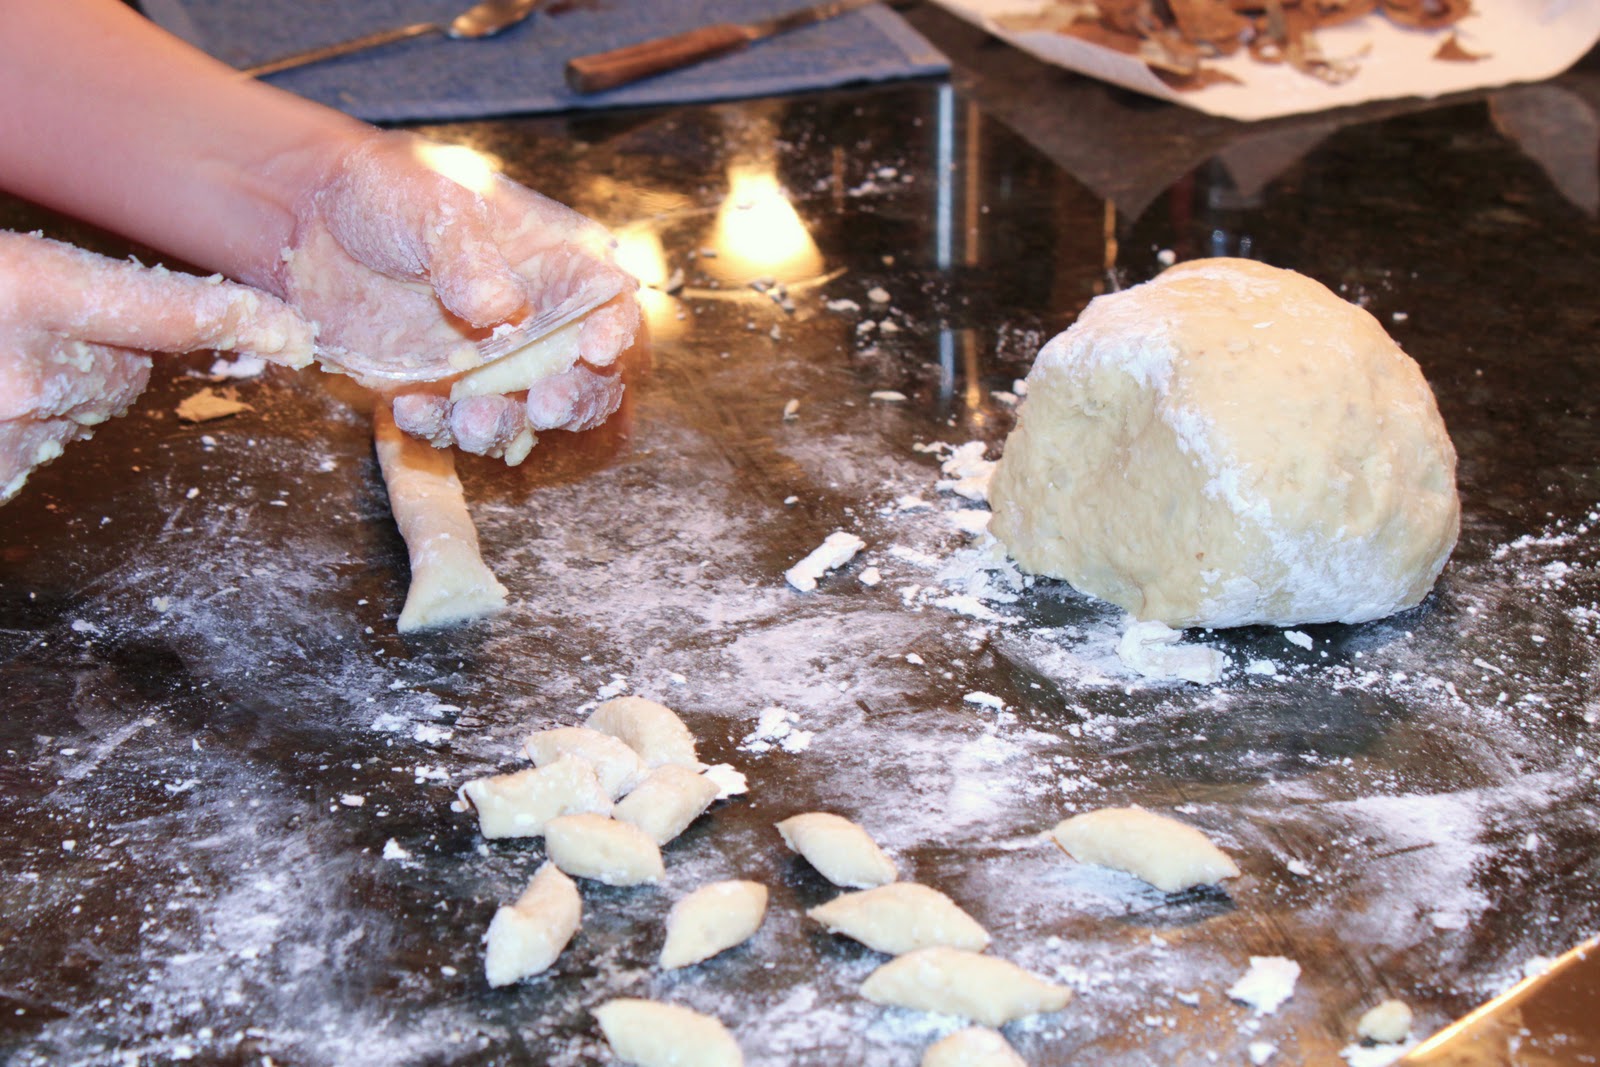
2. Whisk eggs with the salt. Once done, sprinkle flour on the counter and on your hands.  Make a little tire of the potatoes and poru the whisked eggs and pour into the middle concave spot. Slowly mix the potatoes together. Then add in 1/2 cup of flour and keep mixing with your hands. I keep adding 1/2 cups of flour until it forms a good ball.

3. Then, cut into pieces and start rolling into a small log - diameter about 1/2 inch.  Then using your fork, just cut into pieces and with the prongs of your fork, make that typical gnocchi indention. It's okay if your first few, well, 20, gnocchi looks like mushed pasta. It takes a little trial and error to get it right. I placed these on an cookie sheet.
4. Heat a bit pot of water to boil.  Add salt.  Then, in another large sauce pan, add the olive oil and garlic until the aroma starts to really kick in.  Pour in the marinara sauce (you can also substitute with a large can of whole tomatoes and a 1/2 can of tomato paste. You will just need to season a tad more.) and let it cook for another few minutes. Put heat to medium and then start adding the seasoning - S&P, oregano, garlic powder and sugar. Keep tasting and adding necessary seasoning to your liking. I went heavy on the oregano, dash of garlic powder and if the sauce was a little flat or too tart, I added in another tsp of sugar. Sugar is that key ingredient in tomato sauce!

5. Once the water is boiling, put in the gnocchi to cook.  Realize that once they float to the top, they are done.  Don't overcook like I did.  If I did this right, these things should have been taken out in less than 5 minutes.
6. When gnocchi is done, strain out the gnocchi and put directly into the pasta sauce.  Mix it well and for serving later, add grated parmesan cheese on top.  Parsley would have also been a nice touch.

January 03, 2011

Lobster Linguini

This year, we decided to go the non-traditional route with our dinner and have surf and turf - with the custom hot pot, of course.  I must say, Lobstah, was delicious!  So happy!  I haven't had lobster in a very long time and for a moment, I did wish I didn't have it so in the future, I'd be all sad I can't have it on a daily basis. 

Anyways, we saved all the lobster shells and the next say, I use those shells to make a delicious and flavorful stock for some seafood linguini. Can be a tad time consuming but I think it's well worth it - getting as much as possible outta those expensive ocean critters. 

Sorry for the lack of photos but battery was drained from taking many pictures of my niece and it was charging during this time.

Lobster Linguini
Serves 5

Lobster Stock:
Leftover lobster steam water (use the leftover water you steamed the lobster in)
1-2 cups water
Lobster shells
1 can tomato paste
3 stalks celery cut into large pieces
3 carrots cut into large pieces (no need to pell)
1 onion sliced into quarters
S&P

1. Take the lobster water (if you have any), 1-2 cups water and lobster shells and put into a huge pot.  Add in the tomato paste and all the veggies.  Bring to a boil and then let it simmer on medium for a good 45 minutes.  You want all that lobster goodness to seep out into the stock.

2. Once done, drain the pot and discard all the contents other than the stock.  Put the stock into a smaller pot or the same one, and let it cook a little longer on medium to reduce down.

3. Sister was on a non-dairy diet so I used just a teeny bit of cornstarch to help thicken. I imagine this would be delicious with a tbsp of butter or a dash of cream.

Lobster Linguini
1 pkg linguini
1/4 lb of shrimp, peeled and devined
4 garlic cloves chopped
1-2 roma tomatoes cut into cubes
S&P
Small handful of chopped parsley
Lobster Stock

1. Bring a large pot of water to boil to cook the pasta. Cook pasta according to the directions. I liked the linguini but you can use any other type of pasta. 

2. In your pan with the lobster stock, bring it back up to a boil and quickly cook the shrimp in the stock.  This should only take a few minutes and it doesn't hurt that it also gives more flavor to the stock!

3. In a hot pan big enough to hold the pasta, add olive oil and the minced garlic.  Then add in the tomatoes and let them cook on medium high until they start to fall apart. Next, add in the lobster stock until well blended.  Cook for a few minutes until they are well blended and then add in the shrimp and the pasta.  Give it a good mix and to top it off, add in the parsley.  Enjoy!

July 04, 2010

Seafood Shrimp Marinara Pasta

First of all, sorry for the lack of pictures in this post. I made this dish on a night where I didn't have a dish planned, which meant it was a night to cook whatever I had in the fridge, pantry and hope it was edible. This night it was shrimp, spinach and canned tomatoes. WELL. This turned out so fantastic that I rushed to take a picture of the end product before eating.

Several week ago, I bought these large shrimp with their head on in the asian grocery. I love shrimp but especially love shrimp that still have their head on.  The shrimp meat itself doesn't burst with a ton of flavor but with the head, ack, SO much more  - which is perfect to add that big punch of seafood flavoring to soups, sauces, etc.

I know it's hard to find shrimp with their head still on in the normal grocery stores - my Kroger doesn't have - so if you venture out to the chinatown or fiesta in your area, just buy 1 or 2 lbs if they look fresh.  It doesn't hurt that they are usually cheaper there too!  (These huge shrimp were only 6.99/lb - steal!)  When I get home, I like to portion them into individual sandwich/ziploc bags to freeze so you dont have to defrost your entire bag of shrimp when you only need a few.  For the ones used in this dish, I put 6 shrimp per bag.  When you need them, take them out 30 minutes prior to cooking and put in sink with water to help them defrost completely. 

Shrimp Marinara Pasta
Serves 3-4

1 lb spaghetti or linguine
6 large shrimp head-on
2 tbsp butter
32 oz can of tomatoes whole
1 can of tomato paste
1 tsp sugar
1 tsp dried basil
1 tsp dried oregano
2 small balls of mozarella, chopped into small cubes
1 cup spinach
1/4 cup grated parmessan
fresh basil chopped
S&P

1. Make sure to wash and clean your shrimp as well as the spinach.  Bring a big pot of water with a big pinch of salt to boil and cook the pasta.

2. In another saucepan, melt the butter and then add in the can of tomatoes and tomato paste.  Stir the sauce to make sure the paste is spread out and incorporated with the sauce.  I let it cook on medium heat for a good 5-10 minutes.  Then I crush the tomatoes with my wooden spoon so that you get nice big chunks of tomatoes.  I'm sure you can add fresh tomatoes instead but I used what I had! 

3. Add in the sugar, pinch of S&P, dried basil and dried oregano. Give it a taste and add more of any of the above as needed.  Let it cook for another 2 minutes so flavors start incorporating.

4. Next, add in the shrimp make sure they are immersed in the sauce, cover and let it sit for a good 4-5 minutes.  This is where the magic happens.  The juice and flavors from the shrimp heads seeps into the sauce and gives you that great seafood sauce.  Check the shrimp depending on  how big they are - they may need shorter or longer time to cook.

5. Take this off the heat and immediately pour into your big pasta serving bowl and add in the mozarella and spinach.  You need to do this quick so that the cheese and spinach melt and cook from the heat of the sauce.  Next, add in your drained, cooked pasta and give it a good mix. 

5. Last, top with the shredded parmesan and fresh chopped basil.

April 18, 2010

Pasta alla Marsala

When at home, Food Network or HGTV is typically on my TV.  It's the first thing I switch to in the morning and I definitely have my favorites - Ina Garten, Alton Brown, Giadda.  I religiously go to their recipes when I have a main ingredient but no clue on how to cook it.  One of the sunday morning Ina Garten shows included pasta alla vodka and while the recipe looked a tad cumbersome, it looked too delicious not to even try once. 

So, I'm all ready to cook and in the midst of cooking and chopping the first step, I realize I don't have vodka but rum.  DANG IT.  I had to revamp and use marsala wine instead.  So, the end result was good but not spectacular.  It tasted amazingly like the tomato basil soup from La Madeline.  Additonally, this would have been good with some type of protein.  However, the amount of work it took to make this dish - roughly 2 hours, I'm not sure it was worth the end result.  I will have to try again with actual vodka and see if baking this in the oven for an hour makes a big enough difference to go through this process.

Pasta alla Marsala
Adapted from Ina Garten

1/4 cup olive oil
1 onion chopped
3 cloves of garlic, chopped
1 cup marsala sauce
6 tspn fresh oregano, chopped
2 (28 0z) cans peeled whole tomatoes
3/4 cup heavy cream
S&P
1 lb penne pasta
Fresh grated parmesan

1. Preheat oven toe 375 degrees.

2. In a big saucepan, put on medium high heat and put olive oil and onions.  Mix to coat with oil and then add the garlic - this helps to not burn it.  Then add in the marsala wine and let it reduce by half.
3. Add in the tomatoes, 1/2 of the fresh oregano and S&P.  Cover the pot and put it in the oven for roughly 1 hour.  While this is in the oven, start boiling and cooking the penne pasta.

4. Once time is up, take it out of the oven and let it sit briefly for 10 minutes to cool down.  Take our your food processor and then blend everything up. Then pour blended mixture back into the pot and put it on medium high heat.  Add in rest of the oregano and the cream.  Recipe called for 3/4 but I only used 1/2 cup.  Add in some S&P to taste.
5. Next, add in the pasta and mix thoroughly. Add in the grated parmessan on top and serve!

December 06, 2009

Sun Dried Tomato Pasta

Hallo! I am back after a hectic month and oh, how I’ve missed cooking and enjoying dinner at home. With a crazy work launch, moving (woot!) and my sister’s wedding, November was a very good but busy five weeks. Dinners for the past month have consisted of quick & microwaveable meals, pasta from the can (I know, for shame..), dumplings that just need a quick boil or simple takeout.

You can probably tell from my posts that pasta is one of my favorite dishes. Why? Because you can do SO many different things with it. Make it healthy with a light toss of salt, pepper, herbs, veggies and olive oil, toss in a little a tomato sauce, make it taste even better with a few tad weee spoonfuls of cream or have it with protein or seafood. So many ways, I die. I found this recipe from one of my favorite blogs, The Kitchen, which incorporates recipes from a myriad of sources, latest kitchen styles, kitchen/cooking goodies and information about food you may never have heard of. I just love it. I was attracted to the sun dried tomato (which I love when I have in restaurants but never really used or cooked with it myself), basil and of course, cream. This was simple but incorporated very few ingredients that are each packed with flavor so just adding a few things together make a pretty awesome dish. I varied the recipe in how I cooked them but I’ll list both ways below.

As the Mantis said in Kung Fu Panda, “This is so good, I wish my mouth was bigger!” Enjoy.


Sun-Dried Tomato Pasta (adapted slightly from the Kitchen)
(Serves 4) Need: Small food processor, pan for sauce & one large pot to boil spaghetti

5 cloves garlic
3 tbs of fresh basil leaves
1 packed cup sun-dried tomatoes in olive oil, drained (I made this recipe again and actually used sun dried tomato puree & spread that was also in the same section of the grocery)
1 tbs olive oil
1 cup milk
1/2 cup cream
1 tsp hot red pepper flakes (I omitted this)
½ cup parmesan cheese
1 lb. fettuccine or linguine or enough to feed 4 people (there’s a lot of sauce and I tend to like a lighter sauce on pasta)1. Boil and cook to al dente the pasta according to package directions. Put the sun dried tomato, basil and 4 garlic cloves in the food processor. Blend until lightly chunky as the below picture. (The Kitchen recipe only processed the tomatoes and manually minced and chiffonaded the basil. I liked forcing all the flavors to combine first in the processor).2. Heat a pan, put a splash of olive oil and mince the last garlic clove. Add the minced garlic clove until your kitchen gets that yummy roasted garlic smell. Add the sun dried tomato mixture and lightly cook on medium heat for a few minutes.
3. Add the milk and cream and lower the heat. Cook it for a good 7-10 minutes until it thickens a bit and cooks. (You can add in red pepper flakes here if you’d like). Taste and add salt and pepper if needed. (The sun dried tomato mixture is already pretty salty so I just added a pinch of pepper.)
4. Once pasta is al dente, add directly to the pan. Turn off heat and quickly mix the pasta with the mixture. If you need to add some pasta water you can. Last, I tossed in a handful of parmesan cheese to top it off. 5. Serve and enjoy! I served this with a light zucchini salad tossed with a lemon vinaigrette.

October 03, 2009

Roasted Red Bell Pepper Wheat Pasta

Oh, the many ways to make pasta. I religiously read Smitten Kitchen and Sassy Radish food blogs and came across this from Smitten Kitchen. When I’m busy at work and get home late, I want simple, clean dishes that also don’t dirty up a sink-ful of pots and pans. So easy, I omitted a few things, added a few things and needed to add a little protein – ground turkey.

In an effort to cook a little healthier (ha, and pasta’s the answer right?), I started using wheat pasta and maaaaaan, I’m telling you, just not as good. I don’t fall into that dreamy, content state after eating a really good meal, which this SO much better without the wheat pasta. Not saying this dish was not good – it was, but I’m always looking for that oh so perfect dish.

I’ll be conflicted the next time I make pasta. Do I be healthy with wheat pasta and still enjoy a good meal or be naughty use regular pasta to enjoy a great meal? Probably the latter =)

Roasted Red Pepper Wheat Pasta
Adapted from
Smitten Kitchen
(4 cooking items: Big pot to cook pasta, pan to cook ground turkey, food processor and bowl to mix)

1 pound of small wheat pasta
¼ pound ground turkey (I wanted to add some meat to this dish so feel free to omit for veggie dish)
Pinch of dried basil (If you decide to go veggie, don't need this)
Pinch of dried parsley (If you decide to go veggie, don't need this)
Pinch of garlic powder (If you decide to go veggie, don't need this)
3 red bell pepper, roasted, skinned and seeded
1/4 cup olive oil
4 tablespoons red wine vinegar
1 medium shallot
1 garlic clove
Pecorino cheese (I just had this in the fridge so use whatever cheese you have or you can completely omit)
S&P
***Per Smitten Kitchen, you can also add any type of veggies - peas, broccoli, corn, etc.

1. About 1.25 hours before you want to eat, wash and completely pat dry the bell peppers. Do not cut! Lightly pour olive over them (just a teensy tad) and put in 350 degree oven for 1 hour. I like to turn them at 30 minutes to make sure they are cooked all the way around.

2. 45 minutes into this, start boiling water to cook the pasta. Take the ground turkey and I mix it with the basil, parsley, garlic powder and salt and pepper. Tad of olive oil in pan and cook the turkey completely. Make sure to drain any of the oil when done.

3. Once the bell peppers are done, take then out and let them sit for 5 minutes. I like to cover them with plastic or aluminum to trap the steam which also helps you easily pull the skin off. Complete peel and deseed the bell peppers.
4. Put them in a food processor with the peeled garlic clove and shallot. Give it a good blend. Then add in the red wine vinegar, salt and pepper. I love the taste of red wine vinegar so I tend to put more than what folks like to eat. I think this would be fantastic with some champagne vinegar too. Give another good blend and then slowly pour olive oil into the food processor. This should be a creamy, delicious dressing now. 5. Now, putting it all together! Take a big whopping bowl and put the pasta (drain well), ground turkey and then pour the dressing in portions to see how much/how little you want to add. Sprinkle pecorino cheese on top. Next, take a big whiff of the pasta, grab a glass of wine and enjoy.

August 02, 2009

2:1 - Lemon Arugula Pasta w/Herb Pork Chops

Ahhh…. Lazy weekends are always a good refresher. Had the luxury of waking up late, making some quality coffee and enjoying morning shows while lounging on the couch. Before I knew it, it was almost one and we hadn’t had any lunch! While Ross went out on a search for sandwiches, I remembered I had some thick pork chops in the freezer – there’s dinner!

Pork chops are tricky. Depending on the thickness you have, they can overcook in a blink of an eye and then who wants hard, chewy pork? Not me and certainly not Ross! During my last trip to the grocery store, I was surprised to see thick (roughly 1.5 inch) pork chops. They’re usually sliced thin, so I was extremely excited about getting something a little meatier and had high hopes to actually cook it perfectly.

How have I cooked pork chops in the past? Hrm….not well apparently. I typically season with salt and pepper and then pan cook them until they’re done – slice and had with veggies and rice. I’ve crusted them in bread crumbs mixed with seasoning and pan cook – these actually turn out pretty tasty. Or I’ve buttered, S&P and herbed them and popped in the oven, which are not as good since my oven can get testy and before you know it, it’s already overcooked before the allotted six minutes! The trick is trying to cook them but keep all the yummy juices inside the meat until right before you cut a piece to eat – hasn’t happened for me in a long time.

So, not surprisingly, the recipe I used was from Giada. She had a recipe for a dry herb rub pork chops topped with onion marmaletta. I know I was cooking for Ross too but really, I can’t make something I know I don’t like so the onion marmaletta went out the door. Sorry Ross! The only thing I did differently (simply because I didn’t have it) was omit the rosemary but I substituted for dry oregano instead. The pork chops turned out beautifully! They had a ton of flavor, were juicy and complemented the citrusy pasta I made as well.

Well, pasta goes well with almost any meat in my opinion. I had lemons and arugula/spinach I needed to use so why not a recipe with all of it? Simple and from my other favorite Food Network cook – Ina Garten. You can really taste the citrus in this pasta - gives it a little zang! which I loved.

Herb Crusted Pork Chops
Original recipe by Giada
Serves four
Since I didn’t change a good portion of her recipe, I’m not posting the ingredients. You can check it out
here but I’ll walk through what I did below. I cooked it a little differently but the ingredients were almost the same – minus the rosemary.

Combine dry oregano (recipe called for rosemary but I didn’t have), fresh thyme lightly chopped, garlic and S&P. Make sure your pork is cleaned, rinsed and dry. Rub the herb mixture all over the pork, both sides. I let it sit for roughly 15 minutes (you should probably do longer but Ross and I were getting hungry!).
Heat your grill. With a paper towel, pour a little bit of oil and then rub paper towel over the grill.
Grill the pork chops for seven minutes on each side. Since I used my inside grill, I actually put a bowl over the pork chops while they were cooking to help trap the heat and cook a little better – like a real grill! I like to let it sit for just a few minutes to let it cool slightly and to keep the juices locked in. I put them on a plate and covered again with a bowl to keep the heat in.

I didn’t have parsley so didn’t use that. I made a balsamic reduction – just heat on low, balsamic vinegar until thick. Pour just a little bit on top of pork. Or not. The pork chops were actually really tasty that it didn’t need anything else. Pairs well with citrus pasta.
Citrus Pasta
Original recipe by Ina Garten with my adaption

1 tbsp olive oil
2 cloves minced garlic
1 pint heavy cream
2 lemons (zest and juice)
1 orange (zest and juice)
1 tbsp butter
1 tbsp flour
S&P
½ lb angel hair
1/2 pound baby arugula & spinach mix
1 bunch of fresh chopped basil
1/2 cup freshly grated Parmesan

1. In pan, heat olive oil, add garlic and cook until you smell it and right before it gets really brown.
2. Add the cream, lemon zest and juice, orange zest and juice, S&P (as much as you’d like so taste test while cooking).
3. Let it come to a small boil and then reduce for 10 minutes. Heat up the butter in microwave and then add the flour. Mix until paste. Add this to the cream mixture to make sure it is incorporated completely.
4.
Bring pot of water to boil to cook the pasta – I did this a tad too early so had to let it sit while I made the cream sauce. Recommend that you start cooking right when you leave the cream mixture to simmer for 10 minutes. 5. When cream is thick, add pasta, arugula, spinach and basil to pasta and then the cheese. Mix thoroughly and then eat!