October 22, 2011

Vodka Pasta

Vodka pasta always seems like a treat when I go to an Italian restaurant, not thinking I can make it at home. I have tried Ina's vodka pasta recipe and while it turned out well, I was put-off by the complexity of the recipe and the 3 hour cooking time. This basic vodka sauce is from Giada and more importantly, is easy and quick - about 45 min to an hour. 

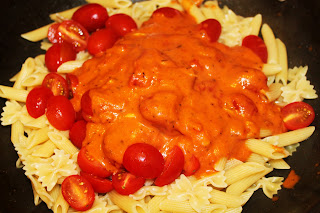
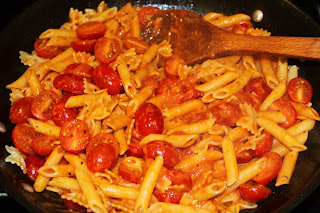
Vodka Pasta with Cherry Tomatoes
Adapted from Giada

6 garlic cloves (peeled and chopped)
1 large shallot, chopped (or two smaller shallots)
2 tbsp butter
1 tbsp dried thyme
1 tbsp dried oregano
2 cans of whole tomatoes
1 small can of tomato paste
1/2 cup cream
1/2 cup vodka
1/2 cup Parmesan
1 tsp sugar (more based on your taste)
Garlic powder
S&P
Cherry tomatoes, cut in half (amount is based on what you prefer)
Cooked pasta (Penne and bowtie work well here)

1. In a cold pot, put the chopped garlic, chopped shallots, butter and dried herbs. Turn on the heat to medium high and let it cook down until the shallots start to get a little glazed.
2. Add in the whole tomatoes. I use my wooden spoon and smoosh the tomatoes into large chunks. I like to let this sit for about 5 minutes so the flavors start mixing together. Take a quick taste for flavor. Add in additional dried herbs if you need to.
3. Pour in the vodka.
4. Add in a can of tomato paste. Bring to a boil and then turn down the heat to medium low and let it cook for 10-15 minutes for the vodka to incorporate well.
5. Now the tasting/testing begins. I add in a tsp of sugar to bring out the flavor of the tomato and a quick dash of garlic powder. Take a quick taste and add in additional sugar, salt and/or pepper.
6. Add in the cream. You can probably omit this step if you prefer, but why?
7. Last, add in the parmesan and your vodka sauce is done!
8. Using a mix of bowtie and penne pasta (so the sauce sticks better and gets into those nooks), I add that to a large medium hot pan with olive oil and additional garlic. I add the cherry tomatoes and give it a give stir to warm through.
9. Add a few large spoonfuls of sauce on top and incorporate well.  Turn off the heat and if you'd like, add additional cheese. Serve with some roasted chicken and veggies! 

October 19, 2011

Prosciutto Egg Breakfast Tarts

Seriously, a very simple dish and quite delicious. Great for breakfast and also easy if you're need to serve for 10+ people. Each person should get at least two.  The directions and photos below are for prosciutto and egg.  However, I made these again for a family gathering and used turkey bacon with the addition of green onions and they were much better; sorry no pictures. Recommend you add in the chopped green onions.

Prosciutto Egg Breakfast Tarts
Serves 2 (2 tarts each)

4 slices of prosciutto (you can also use bacon)
2 egg
Pepper
*1 stalk chopped green onions (entire thing - whites and greens)

1. Preheat oven to 425 degrees. 

2. Spray a mini muffin in (if it's not non-stick or if your bacon/prosciutto isn't very fatty).  Using one strip and form into the shape of the muffin cup.  I cut the slice into two pieces as it was easier to mold. 
3. Crack an egg into a bowl. One egg will fill two cups with one holding the yolk and the other of egg whites. Slowly pour the egg into two cups.  Add chopped green scallions if you have and then top with a little bit of pepper.  I don't add salt as the prosciutto is salty as will your bacon if you use that.
4. Bake for 10 minutes. Bake a little less if you want the yolk to be a little runny. Carefully scoop out the tart with a fork and eat immediately while it is still hot!

October 17, 2011

Roasted Salsa

Why buy salsa when you can make it at home?  This was a fairly easy recipe that took some time and used several bowls/appliances!  Much cleanup afterwards!  I would halve this recipe if you are not making this for a party - way too much.  Additionally, be careful when you add the jalapenos to the food processor, only add a few at a time as it can get a tad overwhelming.

Roasted Homemade Salsa
Adapted from Sassy Radish
Serves a ton (You can halve this recipe or use the Sassy Radish recipe for smaller amount)

10 roma tomatoes
1 1/2 onion, cut into wedges
6 jalapenos
1 bunch of garlic (separate each clove but no need to peel off the skin)
3 limes
Bunch of cilantro
S&P
White Pepper
Few dashes of tobasco sauce

1. Turn on your broiler to high.

2. Put the tomatoes, onion, garlic cloves and jalapenos on a lined baking sheet.  Put under the broiler for 15 minutes (make sure to watch so it doesn't burn).  Take it out and flip them quickly with tongs. Put back under the broiler for 10 minutes.
3. Juice three limes.
4. Put the tomatoes and onion into the food processor. For the garlic, you should be able to easily squeeze out the garlic from the skin. For the jalapenos, cut in half lengthwise and scoop out the seeds. I added in all the jalapenos at once and thought it was too spicy. Recommend that you add in two at a time to determine the hotness of your salsa. Blend everything together.
5. Put the salsa into a large bowl and add in the lime juice and chopped cilantro. Mix well.  Take a taste and add in S&P as necessary. Add in a few dashes of tobasco sauce and for a different flavor, add in some white pepper. Serve with chips!

October 14, 2011

Not My Dad's Rice, But Good Fried Rice Nonetheless

Simple fried rice is the easiest solution when you have leftover white rice - and the quickest dinner!  Fried rice can be made with a variety of ingredients - chinese sausage, shrimp, leeks, peas, corn, leftover pork/chicken or whatever you have leftover in the fridge.

For the actual rice, I find that jasmine rice doesn't work well. I like my rice a tad sticky and typically use a more glutinous rice variety - Kokohuo japanese rice, which you can find in almost every asian grocery store. Looks like they also sell on Amazon, but at an ridiculous price. You can most likely buy for 20-25 in an asian grocery store and it will last for months.

This is a simple vegetarian fried rice with scallions and corn. Serve with some green veggies and it's an easy weekday dinner. Ready for the prep and cooking time? 15-20 minutes max!  Just make sure to prepare/chop all your ingredients before you start cooking since it'll be ready before you know it.

Step three is where you can add in your varied ingredients. If you want to use chinese sausage or meat, cook them first for a few minutes to ensure they are fully cooked/heated through before adding in the veggies since those will cook much faster.  You don't want perfectly cooked meat but overcooked/burned veggies! Increase or decrease the amount of soy sauce you add based on your ingredients. For instance, if you use salty chinese sausage, cut down on the soy sauce. If you use blanced chicken, add a little more.

Vegetarian Fried Rice
Serves 3-4 (pendng how many bowls of rice each person consumes! ;))

3 cups of cooked rice (I used one day old rice)
1 cup of corn (Frozen is fine)
5-6 stalks of green onions, chopped
2 eggs
S&P
1/3 cup soy sauce
Dash of seasame oil
*You can also add in a little bit of fish sauce for varied flavoring. If you do so, cut back significantly on the soy sauce to ensure you don't have an over-salted dish.

1. Prepare all your ingredients because once you start cooking, the process goes very quickly. No time to chop this or chop that in between steps. Chop your green onions/scallions into slivers. I used the entire stalk - waste not!  Next, whisk the two eggs together until nice and fluffy. Make sure your corn is out of the freezer. As for the rice, since I typically use one day old rice, I re-heat the rice in the microwave until nice and hot.
 
2. Heat your pan to medium and add a dash of oil. Quickly scramble the eggs with a tiny dash of salt. Then remove the cooked eggs into a bowl. I like to cook them just a little bit under as it will cook a little more when you add back to the rice.
3. In the same pan, add a little more olive oil.  Then add in the scallion and the corn.  Add a dash of salt to the mixture. Don't skip this step!  This will be the way you ensure the saltiness is incorporated througout the finished rice dish.  Let this cook for a few minutes until the corn is fully heated and cooked. 
4. Turn your heat down to low. Add the hot white rice on top of the mixture and using a flat rice scooper or a flat spatula, start mixing and incorporating the green onion and corn throughout the rice.
5. Add back in the eggs . Slowly add the soy sauce  a bit at a time to ensure you don't put too much at once. Taste and then add more if you need. Next, add a brief dash of seasame oil. Mix to incorporate well. Again, take a quick taste. If you need more soy sauce, add more. I err on adding more soy sauce vs. salt at this point. I like to add in a dash of pepper at the very end to round the flavors out. Serve immediately!

October 12, 2011

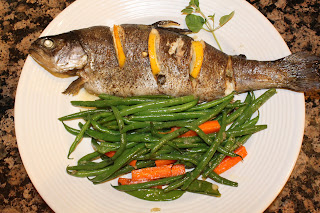
Baked Trout with Green Beans

Growing up, my dad took us on several fishing trips and we soon found out how to de-scale and clean a fish. I remember sitting in our backyard cleaning the dozen fish from our night fishing trips. For the following weeks, having whole fish for dinner was a weekly if not daily dish.

Don't be alarmed with cooking a whole fish. Pretty simple! We bought these good looking trout from Costco and after getting home, I realized that they still had scales. UGH. Should have checked more carefully at the store so the butchers could de-scale them for me. 

I couldn't find any good recipes in my cookbook sso I just went on a whim with this - or should I say, what I could find in my fridget that I thought would go well with trout, which wasn't much. Lemon, butter and herbs. Yeps, that's about it.

Baked Trout

2 whole trout (cleaned and de-scaled)
1 lemons (one cut into slices and the second into wedges)
Several long sprigs of oregano and thyme
4 tbsp butter
S&P
Garlic Salt

1. Preheat oven to 450 degrees.

2. Wash and pat dry the fish. Season the fish with salt, pepper and garlic salt on both sides and inside the cavity. Then, cut deep slit into both sides of the fish and squeeze a lemon slice and tiny slab of butter in each. For the cavity, stuff the herb sprigs and a few more slices of butter. 

3. Place the fish on a baking sheet lined with parchment paper and bake for 30 minutes until completely cooked through.  Prior to serving, take one lemon wedge and squeeze the juice over the fish for additional flavoring.