December 13, 2010

Chicken Wrapped in Proscuitto

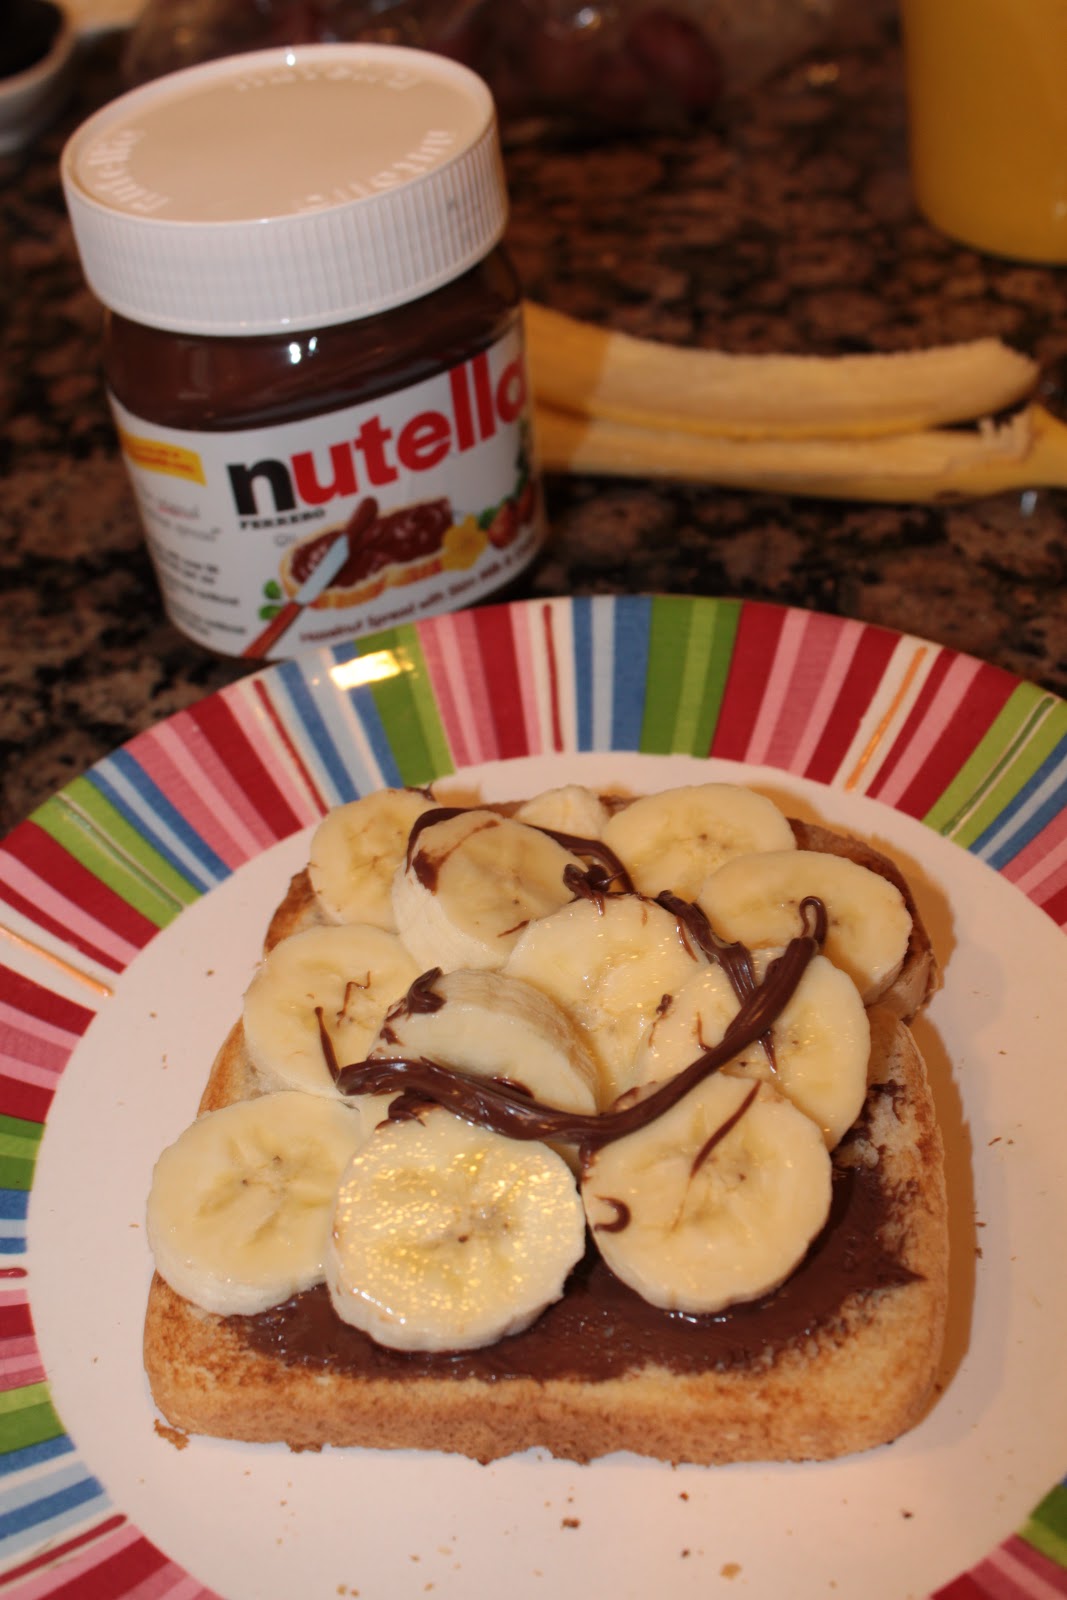
I am particular with my Food Network shows and cooks, and unfortunately, Rachael Ray, is a victim of the pass by click of the remote control.  I'm sure her dishes are fantastic, but I just can't sit through an entire episode.  I'm also not going to into why. =)  Regardless, this is one of her recipes that I found online and it turned out pretty well.  It could use a few more tweaks but still pretty tasty for a first time recipe.

I have an abundance of rosemary and need to find ways to use it before the cold (whenever it comes in Houston) takes it away.  Holy, the many uses for rosemary.  I've used it with steak, with butternut squash, with chicken, with salad dressing, and on and on.  This dish combines the best of three things I'm loving - chicken thighs (hooray! for dark meat), rosemary and proscuitto (hooray! for proscuitto). 
  
I also made this for Hilda and Eric but cooked by quickly searing and then popping in the oven.  I don't think I have a preference on using the pan vs. oven.  I probably prefer to just use one so not to have to hassle with both.  Both tasted similar.  Again, I'll probably tweak this the next time I make it - use orange zest and juice instead of the olive oil, use different herbs (probably just as good with fresh thyme or oregano which I have now thanks to my friend Liz! Look at that trio of fresh herbs!), who knows, so many different ways to tweak! 

Chicken Wrapped in Proscuitto
Recipe adapted from Rachael Ray

4 chicken thighs, boneless
8 sprigs of rosemary (half minced and half whole leaves)
5 garlic cloves, half minced, halfed sliced
4 slices of proscuitto
1 lemon (zest and juice)
1/8 cup of olive oil
1/4 cup chicken broth (you may need more based on your preference)
Dash of dried oregano
Dash of garlic powder
S&P

1. Make sure to wash and dry the chicken thighs. Cut off those excess fat pockets on the thighs. S&P each of the thighs.

2. In a bowl large enough to hold the all the chicken, pour the olive oil, minced garlic and sliced garlic, minced rosemary, oregano, garlic powder, lemon zest and juice. Mix well, add the chicken and coat each side of the thighs.  Let this sit for about 15 minutes.
3. Take the proscuitto out and lay each of the four slices on a board. Take a thigh and put a bunch of rosemary leaves, garlic slices in the middle, wrap up in a roll (as much as you can), and wrap the proscuitto around it.  4. In a medium high pan, sear each side of the chicken.  Don't worry if the middle is not cooked, you just want that crispy proscuitto.  Once seared, add in the chicken broth and cover the pan.  Let it steam cook until done.  

December 08, 2010

Thanksgiving 2010 Part 3: Orange Green Beans

Green beans are a staple at every holiday meal. We've gone through our fair share of variations: canned green beans with cream of mushroom soup, with and without those delicious crispy fried onions, fresh green beans with simple garlic, oil and S&P, to roasted green beans. One year, I made green beans with orange rinds and while it was good, it didn't absorb the orange flavoring as much as I would have like. This year, I tried to cut the rinds smaller and crushed them a little more to really get that orange flavor and I think it worked. 

While I'm a fan of canned food and veggies (my pantry is consistently stocked with canned corn and numerous canned tomatoes), I think this dish is best made with fresh green beans and during the holidays, these are bountiful and reasonably priced.  - 1.29 a lb, yes please!

Orange Green Beans
1-2 lbs of fresh green beans, clipped and washed
2 tbsp butter
1 small handful of chopped bacon
3 cloves of garlic, sliced thin
Rind from one small to medium orange, sliced into strips
Juice and orange segments from that same orange
1/3 cup of broth and white wine (whatever portion you would like)
S&P

1. Make sure your green beans are cleaned and washed.  
2. Get all the bacon, garlic (in the pic below, only the rinds and everything on the right is for this dish.  Trust me, not using all that bacon!) and orange rind ready before you turn on the heat.

3. Add butter to a pan big enough to eventually hold the green beans and liquid. Add in the bacon and let it cook to ooze out that bacon goodness. Then add in the garlic, orange rinds and let those flavors mix togehter.  Yum! 
4. Add in the green beans, orange segments and juice. Give it a good mix. Add in a dash of S&P (a little less on the salt since you do have bacon).
5. Turn the heat down to medium low and pour in the 1/3 cup of liquid. Cover and let this steam/cook for about 3 minutes. Then take the cover off and let it cook for another 3 minutes. Do a quick taste test and add more S&P as necessary.  If you had garlic powder, I'm sure a dash of that would be delicious too!

6.  It's nice if you let it sit a little bit so the flavors are really absorbed into the green beans.  I made this an hour before dinner started, took about 10 minutes start to finish and let it sit the remaining time. Enjoy!

November 30, 2010

Breakfast for Champions

I will get back to Thanksgiving recipes in a bit, but I had to write about the best breakfast I've had in months.  You may think I'm going to write about my love for bacon, eggs and waffles - the typical breakfast for champions.  Nope!  For the past week, breakfast for the Tso's have been Nutella toast with bananas.  Protein:  Nutella.  Fruit: Bananas.  Bread: Toast.  Check, check and check!  Plus, this is super fast to make and only requires three ingredients!  (Note, don't use butter on your toast!)
Let me talk about Nutella for a moment.  I adore Nutella.  If you don't know what this is, I'm incredibly sorry and order you to go to the store immediately, have a taste and then you will understand the greatness that is Nutella.  I first discovered this when I was in London several years ago and would have it with anything and everything.  Nutella on toast after a late night out, Nutella crepe with fruit, Nutella on a spoon.  I die.  I love the creaminess, the hazelnut flavor and how it isn't too overly sweet. I love it so much, it deserves a picture on its own:

November 29, 2010

Thanksgiving 2010 Part 2: Brussel Sprouts w/Bacon

I love brussel sprouts and during my weekly grocery visits, I tend to gravitate towards those mini cabbages.  These have consistently been on our holiday menu for the past few years, and each year, we make slight adjustments.  We've roasted, we've boiled, we've steamed, we've added pinenuts, we've added pancetta, we've added proscuitto, we've added orange...  So many variations, but I think this year's recipe could be it.  So good!

Brussel Sprouts w/Bacon

2 lbs brussel sprouts (We had two large quart containers from the store so I'm estimating two lbs)
3 strips of bacon cut into small cubes (if you used the thanksgiving turkey recipe, save three strips for this dish as well)
3 cloves of garlic, peeled and sliced
1/4 of an onion, sliced into thin strips
S&P

1. Clean and cut the hard end off of each brussel sprout. Boil a large pot of salted water. Once boiling, add the brussel sprouts and cook for 2 minutes - no more!  Take out and put into a large bowl of iced water - to spot the cooking process immediately.  Once they are cooled enough for you to handle, but each into quarters (you can leave whole, cut into halves, whatever you prefer).
2. I like to cut up my bacon, onion and garlic before cooking (picture below is the bacon, garlic for both my brussel sprouts and green bean dish). 
3. Add the bacon to a pan and heat up.  Let it crisp up (roughly 4 minutes) before adding the garlic and onions.  Let this cook for another 5-7 minutes until the onions and garlic are soft.  Continually mix this so nothing overcooks or burns. Add just a tad of salt (bacon should have added some saltiness) and freshly ground pepper.
4. Add in the brussel sprouts and mix well.  Let the flavors coat the brussel sprouts and have a quick taste.  Add some more S&P if you need.

Optional:  You can add in roasted pinenuts.  You can also then put these on a pan and put them under the broiler to let the brussel sprouts crispen up a bit.  Lastly, you can also add a small drizzel of balsamic vinegar (not to be mistaken w/balsamic dressing...) and lightly toss.

Enjoy!

November 27, 2010

Thanksgiving 2010 Part 1: Turkey Brine Success!


Look at that Turkey.  Thanksgiving dinner was a success!  With only five people this year for Thanksgiving, we made sure to portion control what we cooked to avoid a week's worth of leftovers. This year's Thanksgiving was spent in Dallas with my sister, brother in law and my new niece so cooking in a different kitchen in an apartment also played a factor.  No brand new recipes (except the turkey brine) and enhanced current recipes. 

Thanksgiving 2010 Dinner consisted of:
-Brined turkey
-Green beans
-Brussel sprouts
-Mashed potatoes
-Stuffing
-Apple crisp

I'll post those recipes in the coming week but first, the most important Thanksgiving defining dish: the TURKEY.

I've never brined a turkey but have heard several friends highlight their success with it.  Our maple glazed bacon turkey was a success two years ago, but I do have to admit, the white meat is always a little dry.  I received a note from a colleague for a brining recipe found on her aunt's food blog here.  I followed most of the brine recipe (few changes) but did not follow the cooking directions - I went back to the maple and bacon recipe we used in the past, which was from my friend, Linds.  You may remember her from guest blog post of delicious chocolate chip cookies.  

The result?  Ooo-eee.  The meat was deliciously tender and moist.  I don't normally like white meat but I didn't mind eating that this year because it tasted so good.  I think brining will be a must at every Thanksgiving moving forward.  Please share your brining recipes if you have done it before.

Brined Turkey Cooked with Bacon and Maple

For the brine (which you must do two days before Thanksgiving: 1 day to brine and 1 day to rest):
Recipe adapted from Carol Blonder

12-14 lb fresh turkey
8 thick slices of fresh ginger
4 bay leaves
1 Tbsp allspice
6 whole cloves
3 cups apple cider
3 cups water
2/3 cup salt
2/3 brown sugar
1 orange, washed and quarter (keep the skin)

For the turkey:
Recipe adapted from my friend, Linds

8-10 slices bacon (whatever flavor you want)
2 bunches of fresh sage
3/4 stick of butter (soften to room temp)
Zest of one orange
1/3 cup maple syrup
1 cup chicken broth
1 cup white wine
1 head of garlic (sliced in half)
S&P

Brining Process (two days before Thanksgiving):
1. Put the cider, water, salt, ginger, bay leaves, spices, clove into a pot and bring to a boil.  Take off stove and let it sit until it comes to room temperature. 
2. Wash and pat dry your turkey.  Remove the gibblets and such.  Trim off any excess fat. Put it in a large zip lock bag (or a large stock pot to fit the turkey and have liquid enough to cover).  Take the orange quarters and put into the cavity.  
3. Pour the cool/room temp. brine into the bag and let the turkey sit in the fridge for 24 hours.  I flipped the bag halfway through this to ensure the brine is absorbed on each side.
4. After 24 hours, discard the brine, wash and pat dry the turkey. I covered the turkey with wrap and put it back into the fridge for another 12-24 hours. 

Turkey Day (Sorry for the lack of pictures on this part but my hands were too greasy to stop and take pictures at every stop):
1. Preheat oven to 475 degrees.

2. Take turkey out about 1 hour prior to cooking.  Place turkey into a roasting rack - if you don't have one (like me), I used an turkey aluminum pan and used slices of potatoes and oranges underneath the turkey so it was slightly raised from the bottom of the pan since you'll be pour liquid into the bottom (pic below). Tuck the wings underneath so they do not burn.  Cut the entire head of garlic in half horizontally (don't worry about the skin) and put inside the cavity with the orange quarters you already had from the brine.
3. In a bowl, mix up the soften/room temperature butter, chopped/minced sage, orange zest, S&P.  With your fingers, gently separate the skin from the turkey around the breast area.  Taking a big spoonful of the mixed butter, put under the skin and then using your fingers (on the outside) "massage" the butter so it spreads.  Put butter into every nick and cranny you can. 

4.  Wrap the top of the chicken and legs with the bacon.  Lightly pepper.  Pour the chicken broth and the white wine into the bottom of the pan.
5. Bake in the oven at 475 degrees for 30 minutes.  Then turn down the heat to 350 degrees.  Take the chicken out real quick and baste with the maple syrup (i only baste the bacon).  Put back in oven with a sheet of aluminum foil loosely on top (so the bacon doesn't burn to a crisp) and cook for approximately 3.5 hours (for a 14 lb turkey).  Take out throughout to baste with the maple syrup - I did this three times.

6. Once done, take out the turkey and leave the aluminum foil on top to slightly cover.  Let this sit for about 15 minutes so the juices are encased within the meat.  Cut too early and the juices will flow out.  I know the turkey will look at you and egg you on to cut it and sneak a small piece but you. must. resist.  It will be worth it.

7. Slice, serve, making sure to get pieces of the bacon.  Make sure to spoon some of the juices out to make gravy! 

November 19, 2010

Epic Fail: Squash Soup

Not everything turns out as good as I hope.  Some are pushed into my fail category because the taste doesn't turn out as harmonious as I hoped.  Some, like the below, are epic fails when you can't even create a meal.  One night, my Twinkie came over to tell me the details about her recent engagement, see the ring and celebrate with some wine.  Squash was in the oven before she even came over and before long, we were talking and time was passing.  A bottle of wine later and a random sniff of the air, I could see a slight smog in my living room (my kitchen has almost zero ventilation...).  Damn!  I forgot about the squash and below is the unsalvageable remains of my attempt at squash soup...  So, don't always follow directions on how long things need to be in the oven.  Check, lesson learned and I'll check often throughout the roasting period but a bottle of wine later should have been a sign...
Dinner is gone so we ended up going out to Block 7 for dinner, which was incredibly good!  It can be pricey but Jen brought a coupon so we had 50 off the entire meal.  Not bad at all.  Order the fries and they come with their own, restaurant made ketchup - delicious!

November 10, 2010

Why Deny Yourself Happiness? Asian Noodles w/Pork and Shitaki Mushrooms

My folks made this asian noodle dish for us growing up, and we typically requested it as a must for any holiday meal - Thanksgiving, Christmas, New Years, you name it.  There are a few different ways my parents make this and can take a while to make.  Normally, you stirfry the pork and veggies together, boil and cook the noodles, which you then quickly add oil and toss in the air to cool, then you need to add to the veggie/pork mixture and add soy sauce, seasoning, etc.  Well, my mom found a short/easy recipe to cut the time in half and you use only ONE pot.  How fantastic is that?

So many of the ingredients, you can find in the Asian grocery store - noodles, chinese cabbage, shitake mushrooms.
Asian Noodles
Recipe from my Mom!

1 bag rice stick noodles
2 carrots, shredded
1/2 head of chinese cabbage, shredded
1/2 head of broccoli
6-8 shitake mushrooms, sliced (I used dried shitake mushrooms found in Asian markets, soak in room temperature water for at least 1 hours to soften them; don't discard the water!)
1/2 lb pork loin
3 tsp rice wine
3 tsp soy sauce
1/2 cup soy sauce
1 can (2 cups) chicken broth
S&P

1. Several hours before you start cooking, cut the pork into thin strips.  Add the rice wine and the soy sauce. Put in fridge to marinate before you start cooking.
2. Soak the rice noodles in a big pot of room temp. water.  This is to soften the noodles so they cook appropriately. Cut up all the veggies and mushrooms into slices/shreds. 

3. In at LARGE pot, add some oil and add the pork, broccoli and carrots. This should quickly cook since they are sliced so thin.  Next, add the mushrooms and cook for an additional few minutes.  Next add the cabbage and cook for a few more minutes.
4. Drain the noodles and then add to the pot (do not mix!).  Add the 2 cups of chicken broth and cover the pot.  Let this cook for 15-20 minutes.  I check every five minutes and add in more hot water, if needed. After the time is up, mix the noodles, veggies and meat together.  Make sure the noodles are soft and tender. 
5.  Pour the soy sauce into a bowl first. Then, add this in slowly to the noodles to make sure you are not over salting/soy saucing the dish.  Once you've added the right amount (keep tasting), you can add salt (I usually omit and add more soy sauce) and pepper - lots of pepper!  

October 06, 2010

Hearty Breakfast Casserole

At my previous job, we use to have Friday breakfast and would occasionally eat together.  Oh, how I looked forward to Friday breakfast. What is it going to be this week?  Bagels? Fruit? Cereal? Kolaches? Breakfast Tacos?  Always a surprise and then I hit an early food coma at around 1030 a.m.  Loves.

Some lucky Fridays, someone would actually bake something for breakfast.  Laurie brought in a delicious breakfast casserole and I had to beg a little for the recipe.  So easy and good!  My sister and brother-in-law came in for a weekend visit and stayed with me and this was the perfect opportunity to make this breakfast.  Just beware, when you have a hungry and pregnant sister....do the preparation the night before so it's ready to bake when you get up! 

Hearty Breakfast Casserole
Recipe from Laurie Williford
Serves 6

2 cups dry chicken stove top stuffing mix
2 cups milk
1 1/2 cups ham (I had honey baked ham, sliced at the thickest in the deli section and it was about 3 slices)
6 eggs, beaten
1/2 cup shredded cheddar (from the bag is perfect but I'm sure fresh cheddar would be even better)
S&P

*Sorry for the lack of photos. I forgot to take photos until the very end.

1. Preheat oven to 350 degrees and grease your casserole dish with buttah!
2. Mix all the ingredients together and pour into the dish.
3. Bake for 45 - 50 minutes until golden brown on the top and a chopstick comes out clean when you poke it.
4. Let it lightly cool and serve in slices!

October 04, 2010

Red Curry Tilapia

I've been trying to cook more fish recently because well, it's tasty and good for you!  Sadly, I just now realized that my fish cooking includes salmon and yes, more salmon.  I bought a bag of tilapia fillets a few weeks ago so this night was a good night to venture out.  This fish is a good starter since it's fairly easy to cook, mild in flavor and you can basically add anything to it for a tasty, tasty meal. 

My brother gave me a huge book of asian cooking and there was a recipe for fish with coconut.  Perfect!  Granted, in  my quest to cook healthier...curry probably isn't the best way to go. 

Red Curry Tilapia
Serves 3

2 tbsp veg. oil
3 tilapia fillets (you can use another mild fish like cod)
5 tbsp flour
1 garlic clove, minched
2 tbsp red curry paste
1 can coconut milk
2 tomatos, cubed (or in my case, 1 can whole tomatoes chopped)
10 fresh basil leaves
white rice to eat with the curry
S&P
1 tsp garlic powder
1 tbsp fish sauce

1. Clean and wash the fillet and cut into cubes.  Dry with a paper towel.  Put the flour into a plate, mix in salt and pepper and the garlic powder.  Coat the fish cubes in the flour.
2. In a hot pan, cook the coated fish and stir-fry for a good 4-5 minute until they brown and are almost cooked all the way through.
3. In a small bowl, mix the coconut milk, garlic, curry paste and fish sauce.  Pour the mixture over the fish and bring to a boil.  Next, add in the tomatoes and a little of the tomato sauce from the can.  Turn it to medium and just let it cook for a little bit longer.
4. Chopped the basil and add it to the mixture.  Give it a taste test and see if it needs more curry, fish sauce or salt/pepper.
5. Serve with rice and enjoy!

September 16, 2010

Tso's Recommendations: All the Fixins

My friend, Liz, and I talk about food a little too much. So much that one day, we tried to see if we could not mention food once in our conversation, and we failed miserably.  We simply can't resist talking about what we should eat for lunch, what to make for dinner, menu idea help or about the latest food posts on our favorite food blogs.

Let me tell you about Liz (aka. Elizabeth, Chuk, Bug).  I met her on my first day of college where we bonded over Ben & Jerry's ice cream with a pint each...., Central Market runs, Felicity, fried onion rings, Chandler, Harry Potter, grill cheesesandwiches, Barcelona spring break and waffle ice cream on La Rambla and just simple silliness. Are you seeing a pattern and why we are still friends today? 

She also introduced me to Sassy Radish and Smitten Kitchen, two of my favorite blogs.  I love how we get excited when we see a new food post that we want to try, tell each other and then, not be surprised when the other has already seen it or even tried it. 

When she told me she started her own blog, I did a little cartwheel inside!  So, give her some love as she is now, officially....a food blogger.  Add this to your favorites, follow, do what you need to do.  All the Fixins'.  Go. Now.

August 31, 2010

Restaurant Week 2010 Review

Once again, Houston Restaurant Week had its successes and failures.  We limited ourselves and didn't go crazy trying every single new restaurant on the much longer menu, but after one month, I realized I went to a lot!

After my restaurant week experience from last year, we stayed away from hotel restaurants and actually re-visited a few places where we recalled the food being quite delicious.  Some raised our opinion - ahem, Marks - while others were a tad disappointing - Mockingbird Bistro.

Below are my reviews in priority order. Marks topped the charts (I'm SO glad they are part of Restaurant Week now) and Canopy got last place.

1. Marks
You can't go wrong with Marks. I don't think I've ever not liked one of their dishes.  We were seated in the small private room at the very top and despite the overly pink decor (pink walls, pink tablecloth, pink napkins - and not a pretty pink but bubblegum pink!), experience and atmosphere was still great.  They also offered a wine pairing for $22 for each of the three dishes.  
-Seared Foie Gras with duck and quail leg.  DELICIOUS.  Marks changed my outlook on Foie Gras and I absolutely love it.  Ross had the lobster bisque and it was good but not as good as the foie gras.  He mentioned it was slightly too salty.
-Roasted duck with berries and couscous.  Duck was cooked perfectly and there was plenty!  You usually expect a few slices of meat but they served around 5-6 slides and then the duck leg as well.
-Seven Layer Chocolate Cake was good and went very well the port, but so were the other two options.  The lemon meringue was light, not overly tart or sweet.  The shortbread tart was warm, good balance of sweet and the crispy dough.

2. Del Friscos
This was my first time to go to Del Friscos and while it was good, service was a little lacking.  Atmosphere is a down side here - it's hard to get to since it's in the Galleria and you have to battle the traffic.  I'm assuming since it was HRW was why it was so packed but the service was minimal.  We finished our entrees and one of the waiters came our with our dessert to find that our empty entree plates were still sitting there...
-Dinner salad with avocado ranch dressing.  No surprise on the dinner salad, it's a dinner salad, but the dressing was pretty good.  I was basically a ranch dressing with an avocado puree mixed in - why haven't I thought about that before?  Will try to emulate at home.
-8 oz filet mignon with a HEAPING of mashed potatoes.  Meat was cooked perfectly and entirely consumed :)  Potatoes were very rich but good and it filled the plate.  
-Bread Pudding with Jack Daniel Sauce - My main disappointment of the night.  I didn't even finish or get through half.  I didn't like the sauce.  Still think Ruggles Green and Bayou City has the best bread pudding in town.

3. Catalan
Ross and I have heard of the amazing food at Catalan for quite some time from friends.  We just haven't had the chance to make it out there and since HRW extended, why not!  We also went to celebrate that Ross had finally taken his GMAT.  Hooray!  We order a few appetizers from the main menu as well.  It was a oink night for me as I had everything pork :) I's happy.
-Bone Marrow is delicious. There's was good but not amazing.  You scoop someout and put them on these buttered bread, which were a tad too butter.
-Pork skewers was one of the off the menu items and was good, not fantastics.  I think I liked the sauce more than the pork. 
-Pork belly was great! I love pork belly despite the fat but that's what makes it good. I've had pork belly since I was little so when its availabe, I'm usually on board.  The sauce was good and could be a tad overwhelming if you completely doused your pork in it.  But a small dabble with each bit - pretty good!  Ross has the boudin balls and they were pretty good too!  Still would pick the pork belly over them.
-Suckling pig, vietnamese style. I was surprised by how large the portions were!  There are two large pieces of pork (some with the skin and fat - yum) and it was combined with vietnamese noodles and one of my favorites veggies - brussel sprouts!  So good but I was so full and could not finish.
-Pecan bread pudding.  I would definitley get this over the others.  We tried all three and I think it was the best one. Again, still not as good as Ruggles or Bayo.  DO NOT get the panna cotta - it was one of the worst things I've had in a while. I had one of those moments where you want to spit it out but can't  so you reluctantly swallow as fast as you can.  

4. Mockingbird
This was actually a disappointment for me.  It's been a long while since I've been back but remember it being pretty fantastic.  It's a cute little restaurant with some great old world decor.  Dessert was the best thing about the meal.
-Cantaloupe Soup.  It was a tad too mealy/grainly for me and actually and I don't know what I expected to get when I ordered it.  The bits of the proscuitto was a tad odd and I dont think fit that well the texture of the soup.  Should have gotten the onion soup.
-Prime Steak was okay.  A tad mealy and after having Del Friscos, you definitely see the difference.  The fries, however, so good!
-Trio of Dessert of Bread pudding, chocolate truffle and creme brulee was the BEST part of the night.  Bread pudding the creme brulee was gone first.  Truffles are hard to eat since they are so dense.  Only able to take a few bites but those bites were quite good!

5. Canopy
HRW has the new deal where it's $20 for lunch of two dishes.  After looking through all the menus, Canopy caught my eye.  We went for a lunch while my sister was in town and it was okay - actually, not sure if it was worth the 20 bucks per person!  Interestingly, Ross and I went to Shade the week prior and had a disappointing experience.  Food was okay and not worth the price.  Found out that Canopy is a sister restaurant of Shade....
-Mussels in white wine sauce.  Sauce was minimal and they didn't even bring out bread to dip! Big no no.  The mussels were small and you only get 5!  Also, didn't get the sense that they are incredibly fresh.
-Pan roasted salmon was actually pretty good.  It was cooked perfectly and had that great crunch top on it.

August 30, 2010

Baked Lemon & Thyme Chicken

While shopping at the amazement that is Costco, I tend to get sucked into the book section as well and that day, found an Ina Garten Back to Basics cookbook.  Hooray!  Since I'm already going to spend $100 bucks at Costco (why is it that you can NEVER leave Costco without spending at least $100?), what's one book?  It seems that convincing yourself to buy more things when you're already spending a lot is pretty easy....

I've tried this two ways - baked in the oven and also on the grill.  I prefer cooking in the oven since the meat is a little more tender, moist and juicy.  Grilling seemed to make the chicken a tad too dry and didn't hold the flavor as well since you are not grilling directly in the juices. 

I suggest marinating this the night before in a plastic bag or in the baking dish so when you get come, preheat the oven and then just put in the dish.  So easy.

Also, notice those green beans in that top picture?  From my daddy's garden!  He's the only one in this family with a green thumb.  I usually get a bag of fresh green beans every time my folks come over = very spoiled.  Clean, snap and cook in oil with garlice, salt and pepper - so good and love the crunch too.

Baked Lemon & Thyme Chicken
Adapted recipe by Ina Garten

4 chicken leg and thigh (bone-in)
6 sprigs of thyme and chopped
2 tspn of salt
2 tspn of pepper
4 lemons (zest of 2 and juice from four)
1/3 cup of good olive oil
5 garlic cloves, peeled and chopped

1. Take the thyme and roughly chopped.  Do the same with the garlic.  Add both to a baking dish large enough to fit the chicken. 
3. Clean the lemons and zest two directly into the baking dish.  Squeeze juice from all four.  Add S&P and the olive oil.  Give it a good mix.  Do a quick taste test - and add more lemon juice or S&P as ncessary.  
4. Rinse and pat dry the chicken.  Add to the baking dish, moosh around and then turn over the chicken.  Cover tightly and let it sit in the fridge for at least 4 hours.  I highly recommend doing this the night before and the next morning, turn over the chicken before heading into work. 
5.  In a 420 degree oven, cook chicken for approximately 20-25 minutes.  Halfway through the cooking process, I like to scoop the juices over the top.  When time is up, insert a fork and make sure it's cooked through.  Serve with a side of veggies and rice!

August 16, 2010

Kiwi Vinaigrette - Aunt Chien's Versatile Salad Dressing

I've referenced my Aunt Chien in prior posts.  She's the amazing aunt that cooks, arranges flowers and graciously shared her banana nut bread recipe with me.  Well, she was in town again for a visit and of course, our family EATS.  She showed us how to make the most simple salad dressing with common cupboard ingredients and fresh fruit.  That night, it was with kiwi and mangos.  I don't see why you couldn't use strawberries, rasberries or blueberries if that is what you have in your fridge.

Beyond just tasting good, knowing exactly what went into it, and simply how fast and easy this is to make, I also like that you can keep this in the fridge for a few weeks. Make a batch, put into a pourable container/jar, and it's a quick pour each time I need it.  In addition to salads, I'll just use this when I have my cucumber or sweet snap pea veggie snacks throughout the day.  If you have some cheese, even better.  I had this kiwi dressing in a salad with some blue cheese - um, hello!  They tasted delicious together!  I've made this with kiwi, mangos and strawberries with the latter being the best in my opinion.

Also, my other Aunt had this fun appliance called the Magic Bullet.  You put everything in the cup, blend and in two seconds, it's done.  Serve right about of the cup.  Amazing.  I want one. 

Kiwi Salad Dressing
Recipe from my Aunt Chien

2 kiwis
3 Tbsp apple cider vinegar
3 Tbsp honey
4 and 1/2 Tbsp olive oil
1 lemon
S&P

1. Peel and cube the kiwi. 
2. In a blender, add everything in except the lemon.  For the honey, adjust if your fruit is very sweet.  For istance, if you are using a sweet mango, I would only use 1 tbsp of honey.  You can use about 6 large strawberries or a good handful of rasberries.  I have some frozen rasberries that I will try next. 
3. Give it a good blend and then squeeze half of the lemon in.  Taste and if you feel like you need more, squeeze the other.  Also, I like my dressing on the tart side and find myself adding just a tad bit more vinegar.