April 29, 2010

Say What? Chicken in Milk?

I've started paying more attention to Jaime Oliver particularly since he is now has the reality-TV show Food Revolution.  For work, I've been looking into TED conferences, which is a gathering of visionaries who give talks on what we can do to change the world.  Jaime gave a talk on "Teach every child about food," and I was fascinated about his findings.  He pushes for parents, teachers and schools to use fresh food as nutrition/obesity-related deaths are higher than even smoking.  What surprised the heck out of me was when he showed kids fresh food and asked them what they were called.  Easy right?  Nope, they had no clue.  They called tomatoes - potatoes, beets - onions, cauliflower - broccoli.  Anyways, watch his show or watch his talk if you have some time.

About a month ago, I found his "Chicken in Milk" recipe and was so perplexed by the combination and then even more perplexed when I read all the ingredients - cinnamon stick????  However, all the reviews and comments say that this dish is spectacular.  While not a simple dish to cook - you need the stove and the oven, the meat was definitely very tender.  I don't love this dish simply because I was a tad put-off by the cinnamon flavor, which is also my fault since I used cinnamon powder instead of the sticks.  I just couldn't justify spending eight bucks for sticks when I hardly use them.  Overall, it was good but not spectacular. I don't think I'll be trying again for awhile until I have a good reason to use lots of cinnamon sticks!

Chicken in Milk
Slightly adapted recipe by Jaime Oliver

2 cornish hen (or you can use 1 chicken)

1/2 stick of butter (don't fret, you throw some of it away)
1/2 cinnamon stick (I tried to cheat and use 1 tsp of cinnamon...)
2 tsp olive oil
S&P
Zest of 2 lemons

1 tbsp of fresh sage
10 cloves of garlic, skin left on
1 pint milk

1. Preheat the oven to 375°F. 

2. Wash and pat dry your cornish hen.  Season with S&P all over and even inside the cavity.  Find a pot (that is also oven safe) that can fit the two hens.  Heat the pan on the stove and melt the butter and olive oil.  Once medium hot, add the hens and let them brown on each side.  
3. Once golden, take out the chicken and discard the oil and butter (phew!).  You should have some chicken debris at the bottom.  Put the hens back in the pan.  Then add in the zest, cinnamon, garlic, sage and milk.
4.  Put in the oven for 1 1/2 hours.  Half way through the cooking process, take out and quickly spoon the liquid over the chicken.  Don't worry if the sauce looks curdled - it's caused by the lemon zest with the milk.
5. Take out and let it sit.  The meat should fall of the bones!  I ate this with some white rice and make sure to spoon some of the sauce on the chicken and rice!

April 27, 2010

Restaurant Review: Abacus (Dallas)

When I started my new job, I spent a few days in Dallas and was able to spend the evening with my sister and Eric.  When I told her I was coming, the first thing she asked was, "where do you want to eat?!?"  I love my sister :)  The first night, we went to Abacus and oof, ate so much I went into an immediate food coma.  The second night, Chef Eric cooked his yummy Sinigang soup, which I tried to recreate and home and will post in the coming days. 

Abacus is run by Chef Kent Rathbun and this restaurant has earned a slew of accolades including Bon Appetite's Best Tasting Menu. The atmosphere consists of a black and red decor and was surprisingly busy on a Tuesday night with plenty of tables of business dinners. Appetizers, side dishes and entrees were all delicious!

Tempura Calamari with a sweet thai sauce. There were also tempura fried scallions and mushrooms. This was surprisingly delicious and highly recommended.

Creamy Black Truffle Risotto - This absolutely kicks major butt. Sometimes you don't really taste the "truffle" but this risotto, perfect combo of creamy/cheesy goodness mixed with that hit of truffle. Um, if I didn't consume my entire entree, this would have been gone in a flash!

Pomme Frites w/White Truffle Oil - Good but not spectacular.  Didn't really taste the truffle and when taste the truffle risotto before this, every other side dish just doesn't compare.

Applesmoked Bacon "Mac & Cheese" - This was my least favorite side dish.  Nothing spectacular and didn't really taste any different than other mac and cheeses. 

Duck w/blackberry sauce - The online menu doesn't show this but the duck was pretty fantastic. There were plenty of medium cooked duck and I would take a bite with a bit of blackberry sauce. 

Eric tried the seared venison and I'm not exactly sure what my sister had.  Thinking it was fish but I had a bite and I remember it being quite tasty.  Per my last experience w/venison I didn't have any of Eric's venison so not sure if they were good or not - he said they were.

Overall, I give this place a 4.5 out of 5.  Decor was good and we got to sit in a little booth.  It did get pretty loud at times. Food was good and the waiter wasn't too pushy.  We left feeling pretty great after eating such a good meal.

April 20, 2010

Restaurant Review: Branch Water Tavern

For our monthly supper club, we ventured to a Washington area restaurant - Branch Water Tavern.  Branch Water is run by Chef David Grossman, who also worked at Reef and Gravitas. He opened up Branch Water with the vision of making "classically inspired modern American cooking." The decor is really fascinating. When you walk in, to your right is a bar lounge with this awesome black and white XXX wallpaper...I forget the design but will update once I remember!  The restaurant itself is a little mixture of old fashion warehouse, brick with a modern twist.  The restaurant isn't incredibly large or incredibly loud, which is always a big plus to be able to hear the person sitting across form you.


Let me back up a little and talk about how we select new restaurants.  Our "selection process" for new eats consists of I want to try this place because of xxx, and this place for their xxxx and oh, this place too.  Surprise, we never really omit places, we just keep adding them to our list.  So of course we took a peek at the menu before going and of course, saw the duckfat popcorn which sold us as the March choice. 
 
We shared several appetizers, which I actually think were the best part of the meal.
 
Duckfat Popcorn - It's popcorn folks. No matter where you are, once you have some, you can't stop popping them in your mouth. There some crack in corn that makes you keep eating until you realized you've eaten an entire container.  So, the duckfat did not hit you in the face but every once in a while, you take a bite and get a "oh, THIS is what duckfat popcorn is all about."  It's good but will not be a driving reason for me to come back.
 
Crispy stuffed olives - Very large olives that had a good combination of fried-ness w/saltiness.
 
Chicken fried oysters w/celery root slaw - Um, these were amazing. I would have this for my entree if it was an option.  I worry when I see fried oysters that they come out on the dish the size of a quarter and you end up taking the fried crust more than the actual oyster. These were medium size so you were able to taste the meat of the oyster and when combined with the slaw and a pinch of the sea salt bed it came on - pretty fantastic!
 
Jumbo crab cake with thai salad "som tam" - This was suprisingly delicious.  A clear winner for crab cake is if you notice lump crab more than the seasoning or the bread crumbs that hold it together.  It has to have a majority percentage crab to everything else. This hit it right now and each bite was lump crab goodness. 
 
So for my entree, I had the venison medallions - which was my first time.  I'm not a fan.  It's not due to their cooking or the quality - which was perfectly cooked without any game-y taste - but it's just one of those experiences you have to go through to know, okay, I don't like something no matter how well it's cooked. 
 
Friends had the seared scallops which were pretty good and plentiful.  Many times you only get three or four scallops for the 25 bucks you pay! but here, they gave plenty to be full by the end.  
 
Overall, I enjoyed the atmosphere but simply due to the my newfound dislike of venison, this place sits lower than it really should with a 3 stars out of five.  The appetizers were really good but the meal was a tad pricier than I anticipated as well.  My meal of shared appetizers, no drinks and entree was $50.  Not outrageous but I'm not completely sold what I ate was balanced with the price.

April 18, 2010

Pasta alla Marsala

When at home, Food Network or HGTV is typically on my TV.  It's the first thing I switch to in the morning and I definitely have my favorites - Ina Garten, Alton Brown, Giadda.  I religiously go to their recipes when I have a main ingredient but no clue on how to cook it.  One of the sunday morning Ina Garten shows included pasta alla vodka and while the recipe looked a tad cumbersome, it looked too delicious not to even try once. 

So, I'm all ready to cook and in the midst of cooking and chopping the first step, I realize I don't have vodka but rum.  DANG IT.  I had to revamp and use marsala wine instead.  So, the end result was good but not spectacular.  It tasted amazingly like the tomato basil soup from La Madeline.  Additonally, this would have been good with some type of protein.  However, the amount of work it took to make this dish - roughly 2 hours, I'm not sure it was worth the end result.  I will have to try again with actual vodka and see if baking this in the oven for an hour makes a big enough difference to go through this process.

Pasta alla Marsala
Adapted from Ina Garten

1/4 cup olive oil
1 onion chopped
3 cloves of garlic, chopped
1 cup marsala sauce
6 tspn fresh oregano, chopped
2 (28 0z) cans peeled whole tomatoes
3/4 cup heavy cream
S&P
1 lb penne pasta
Fresh grated parmesan

1. Preheat oven toe 375 degrees.

2. In a big saucepan, put on medium high heat and put olive oil and onions.  Mix to coat with oil and then add the garlic - this helps to not burn it.  Then add in the marsala wine and let it reduce by half.
3. Add in the tomatoes, 1/2 of the fresh oregano and S&P.  Cover the pot and put it in the oven for roughly 1 hour.  While this is in the oven, start boiling and cooking the penne pasta.

4. Once time is up, take it out of the oven and let it sit briefly for 10 minutes to cool down.  Take our your food processor and then blend everything up. Then pour blended mixture back into the pot and put it on medium high heat.  Add in rest of the oregano and the cream.  Recipe called for 3/4 but I only used 1/2 cup.  Add in some S&P to taste.
5. Next, add in the pasta and mix thoroughly. Add in the grated parmessan on top and serve!

April 12, 2010

Crab Fried Rice

You can see the seafood theme from these past few posts.  My sister taught me this dish when she was still living up in Ohio living in her cute little apartment.  Us Tso sisters, we like - scratch - love to eat.  Seriously, a good portion of our conversations revolve around food.  The night we made this, we cooked a huge pot hoping for leftovers the next day for lunch.  We should have known better  because within 20 minutes, the entire pot of crab fried rice - GONE.  No, we didnt just have one bowl, not just two bowls, but we each had three bowls.  Not sure what got into us that night but man, we had a nice little pot belly that night and I would change it for anything!

As for the crab, it's a option of whether you use the canned crab meat (gasp, I know...) or the fresh lump crab from the seafood section.  If I could afford the fresh lump crab every time I make this dish, I would but alas, with a working PR girl budget, I must work with the canned crab.  It's okay, just use two cans and it is still pretty good.

Also, make your rice several hours before so it's not too sticky when you mix together or you can even use day old rice which sometimes works better!  Additionally, don't nix the cucumber slices.  It makes a huge difference - having a bit of crisp cucumber is so refreshing and complements the rice so well.

Crab Fried Rice
Recipe from my sister

1 pint fresh lump crab or 2 cans of crab
3 tbspn veg. oil (do not use olive oil - it actually messes up the taste)
4-5 cloves of garlic chopped
1 green onion chopped
2 eggs
3 tsp fish sauce (i really like the flavor of fish sauce and its saltiness, but add less if you don't)
2 tsp sugar
1 tsp light soy sauce
12 slices cucumber
2 cups rice (cook the rice several hours before so it's not steaming hot or sticky. You can use day old rice and quickly heat up in microwave before you add to the pan)

1. Beat the eggs and quickly scramble in the pan with a little bit of oil. Once done, take the eggs out and set aside.  In the same pan, add the rest of the oil and brown the garlic.  I put my heat on medium high so the garlic doesn't burn in 10 seconds.
2. Once they are lightly brown, add the rice, crab meat, eggs.  Give it a quick toss. 
3. Then add in the fish sauce, soy sauce and sugar.  Cook for about 4-5 minutes.
4. Sprinkle with green onion and serve with slices of cucumber! 

April 06, 2010

Shrimp & Mango on Romaine

I pretty much love seafood and since shrimp is one of the cheapest to buy, I tend to cook it a lot. Whether it's shelled shrimp cooked with green onion and ginger, shrimp cooked with green asian squash, shrimp in pasta, shrimp ceviche or shrimp in udon soup, I'm pretty much a happy camper.  How bad do I have it? At restaurants, Ross can almost always predict what I'm going to order simply because of those six little letters.

This is a quick and easy appetizer.  The longest part was peeling, cleaning and cooking the shrimp and letting it cool a little bit.  Otherwise, this is done in just a few chops and mixes!  The original recipe calls for endive instead of romaine lettuce, which I was hesitant to purchase because folks, endive sure isn't cheap!  Also, make sure the mango is ripe, juicy and sweet. The one I bought was a tad too under riped and while it was okay, it could have been sooooo much better. 

Shrimp & Mango on Romaine

1/2 lb shrimp (peeled, deveined, cooked and cubed)
1 large mango, cubed
3 tbsp olive oil
1 lime, zest and juice
1 lemon, zest and juice
4 tspn grated ginger
S&P
8-12 Romaine leaves
2 large grab-fuls cilantro, chopped
1 small handful of mint, chopped

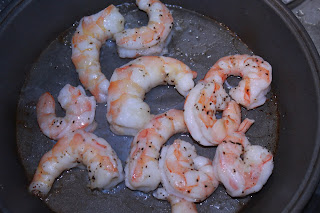
1. Heat oven to 400 degrees. Peel and de-vein the shrimp. Pat dry the shrimp and put on a baking sheet.  Lightly toss with salt, pepper and 1 tbsp olive oil.  Bake for roughly 8 minutes - check through oven window and when they are pink and opaque like the below picture, they are done!  Don't over cook.  Take out to cool and then chopped up into small cubes.
2. Start chopping! Chop the mangos, mint and cilantro. In a bowl, zest the lime and lemon. Add the juice of both. Add in the grated ginger, salt and pepper, olive oil, mint and cilantro.
3. Add the chopped mango and shrimp to the liquid mixture.  Quickly taste to make sure you have enough salt or lemon juice.  Scoop mixture into individual romaine leaves and serve! 

April 02, 2010

Roasted Cauliflower and Onion Tart

You may have noticed my previous posts have consisted more of restaurant reviews rather than recipes.  After some work and then have a broken fridge for over a week, I was SO happy to be able to eat in.  I have quite a few meals I've cooked up this past week so I'm going to do my best to get posted. 

Now, on to the tart!  Surprisingly, I've never made a savory tart before.  My tart experiences have consisted of sweet apples, berries and almond!  This recipe is from one of my favorite blogs, Smitten Kitchen, and the roasted cauliflower basically called my name.  I love roasted cauliflower. Why? It's simple, healthy, fast and delicious!  I secretly jumped for joy when I realized that I had too much roasted cauliflower to put in my tart and meant that I could have something to munch on while the tart baked. Hooray!

I didn't have the ingredients to make my own tart but I think the store bought pie dough was good enough.  I would not pre-bake the tart (like I did) as I think the crust was too overcooked by the time it was done.

Also, for the ingredients, I like to let them sit out for an hour at least so they soften and get to room temperature - like the marscapone cheese, whipping cream, eggs and cheese.

Roasted Cauliflower and Onion Tart
Serves 6

Click here for the ingredients since I didn't do anything different than omit the Guyere cheese.

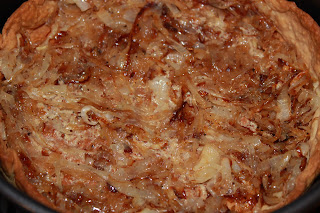
1.  Slice up the onions and put some olive oil in the pan.  Let the onions cook on medium-low heat and let it cook for roughly 20-25 minutes until it's all golden like the below picture.   
2. Pre-heat oven to 425 degrees.  Wash and break up a small head of cauliflower.  Pat dry and lay out on a sheet pan.  Coat with olive oil, salt and pepper. I like to wear gloves when tossing so my hands do have a slimy texture afterwards. Cook for 15-20 minutes (flip half way through) until they are nicely roasted like the below picture.  (Note, use this same process for when you simply want to make roasted veggies for dinner.)
3. Mix together the heavy cream, marscapone cheese and eggs.  Add a dash of pepper.  Mix thoroughly (it will be a tad chunky) and then add in the cheese.  I omitted the Guyere cheese per SK's recipe.   
5. Put the pie crust into a 9-in tart pan or a normal pan with a removable bottom.  In this recipe, I pre-cooked the crust but I'd advise you not to since it was a tad overcooked in my opinion.  Spread dijon mustard on the bottom and then layer the onions over that. 
6. Add in the roasted cauliflower on top.  If you were lucky like me, there were leftovers that I was able to eat while this sucker was cooking! :)
7. Next, pour the egg and cream mixture on top.  It fix just perfectly :) 
8. Cook for 40 minutes until it's firm to the touch and looks like the below.  Be careful and don't cut into it right away.  Let it cool for a good 10 minutes.  Slice like pie and serve with any other side of veggies!