January 09, 2011

The Good of Gnocchi

I love pasta, and of course, also love these little balls of springy, fluffy potatoes. The gnocchi at Maggiano's with simple tomato sauce is one of those consistent dishes that is perfect every time you have it, and every few months, you recall those mooments of popping one of the sauce covered potato fluffs into you mouth and you want some immediately. I don't crave pasta from a restaurant very often but this dish I do. 

The very first time I found gnocchi at the store, I got a little giddy, bought additional ingredients to make a good sauce, and of course, forgot what I needed from the store and left without completing my list because all I could think about was GNOCCHI.  Bleh, what a disappointment!  Nothing is better than the restaurant but it wasn't even close. Maybe it was the high expectation set of finding this in the store and thinking this must be good. 

During my holiday stay at my sister's house, we didn't have anything planned for dinner, and I was looking through one of the many food blogs I read.  We saw a post on homemade gnocchi and it looked so easy and even better - only four ingredients, all of which we had leftover from Christmas dinner.  First mistake - don't think just because there are few ingredients, that this isn't labor intensive or time consuming, because it is. In my case, about 45 minutes longer than I thought!

They were good but not as good as I had hoped. The gnocchi itself lacked a little flavor, and next time, I will bump it up with some additional seasoning and maybe fresh herbs rolled into the dough. Also, I overcooked the gnocchi. There's no time limit on how long they cook before they are done. Many blogs will say, the gnocchi tells you when they are ready - they float to the top.  I put the first few in, turned around to get more and when I was about to put more into the water, the first ones I put in were already floating!  Seriously, can it really be ready in less than a minute?  I didn't think so and left them to cook much longer, and ultimately, took out that chewy, springiness that is the good of gnocchi.  That said, I think I will be venturing on a gnocchi adventure and try out several versions over the next few months. 

Homemade Gnocchi
Serves 8-10 (I froze half and cooked half to serve 5)
Recipe adapted from Bitchcamero

For the gnocchi:
4 potatoes, boiled with skin on for about 45 minutes
2 large eggs
1 tsp salt
2.5-3 cups cake flour

For the sauce:
1 jar of marinara sauce
3 cloves garlic, minced
1 tsp of sugar
1-2 tsp of garlic powder
1-2 tsp of dried oregano
S&P
Grated parmesan cheese

1. After you take out the potatoes, you can easily peel off the skin with a fork. Then, you can use your fork and fluff them into pieces.  Don't mash is what bitchencamero suggests since you want that extra "fluff." 
2. Whisk eggs with the salt. Once done, sprinkle flour on the counter and on your hands.  Make a little tire of the potatoes and poru the whisked eggs and pour into the middle concave spot. Slowly mix the potatoes together. Then add in 1/2 cup of flour and keep mixing with your hands. I keep adding 1/2 cups of flour until it forms a good ball.

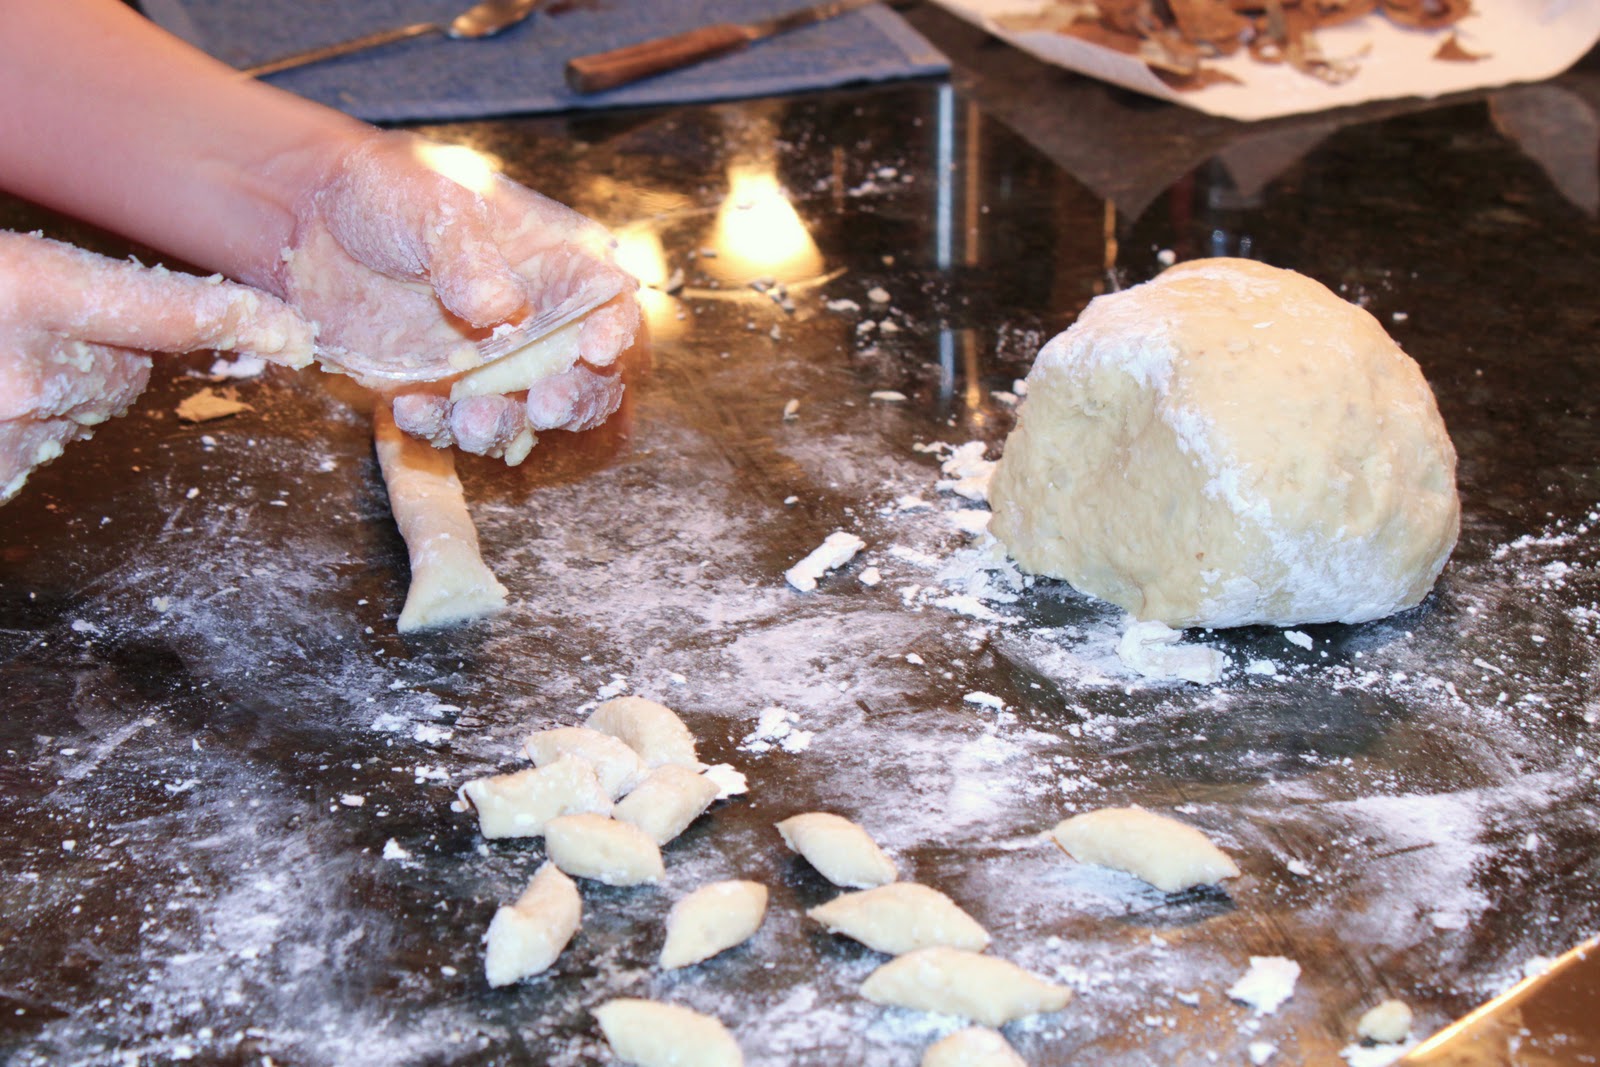
3. Then, cut into pieces and start rolling into a small log - diameter about 1/2 inch.  Then using your fork, just cut into pieces and with the prongs of your fork, make that typical gnocchi indention. It's okay if your first few, well, 20, gnocchi looks like mushed pasta. It takes a little trial and error to get it right. I placed these on an cookie sheet.
4. Heat a bit pot of water to boil.  Add salt.  Then, in another large sauce pan, add the olive oil and garlic until the aroma starts to really kick in.  Pour in the marinara sauce (you can also substitute with a large can of whole tomatoes and a 1/2 can of tomato paste. You will just need to season a tad more.) and let it cook for another few minutes. Put heat to medium and then start adding the seasoning - S&P, oregano, garlic powder and sugar. Keep tasting and adding necessary seasoning to your liking. I went heavy on the oregano, dash of garlic powder and if the sauce was a little flat or too tart, I added in another tsp of sugar. Sugar is that key ingredient in tomato sauce!

5. Once the water is boiling, put in the gnocchi to cook.  Realize that once they float to the top, they are done.  Don't overcook like I did.  If I did this right, these things should have been taken out in less than 5 minutes.
6. When gnocchi is done, strain out the gnocchi and put directly into the pasta sauce.  Mix it well and for serving later, add grated parmesan cheese on top.  Parsley would have also been a nice touch.

January 05, 2011

Round Two! Kata Robata Omakase

Happy Birthday to me! Ross treated me to an omakase experience at Kata Robata and it lived up to our hype from the first time we did it early last year.  Read about my first experience here.  With such a high bar set last time, I was hoping that it would be just as good. Well, Hori-san didn't disappoint.  What I love about omakasi is that you will never get the same thing twice when you do this. 

This time, the kitchen chef was Seth Siegel-Gardner, who is on a special 6 month contract with Kata Robata.  An acclaimed chef, his experience includes being the executive sous chef of Gordon Ramsey and also worked at Aquavit, restaurant owned by Top Chef Master Marcus Samuelsson.  He was taking a break and Hori-san went to one of his dinners and he invited Seth to come to Kata Robata for an omaske experience. While there, Hori-san asked Seth to join for a few months and good thing he did!  Seth has never done Japanese and he brought such an innovative and unique level to the restaurant.  Read a Houston Press here.

Also, what I love is that Hori-san and Seth are a team. They make sure their dishes complement each other and when to use the right ingredients. I was looking forward to Hori's signature foie-gras and scallop dish, but Hori-san highlighted that Seth was featuring foie gras and didn't want to serve the same ingredient in his dishes to make sure we got a full spectrum of flavors. 

This is a long post with every detail I can recall, because I don't want to forget this myself!  And now, let's begin.

 Honey mussels with a citron vinagrette (left) and a cucumber vinagrette (right).
Left: Norweigan salmon and toro sashimi. That salmon sashimi - literally like butter and one of my favorites of the night. In retrospect, Ross offered me a piece of his because I liked it so much and I TURNED IT DOWN. What was I thinking?!?! Do-over, please.

Right: Light salad of palms of heart and jelly with pickled tomatoe, pickled cucumber, sea bean, and pickled cucumbers.  Very delicious and a nice light complement to the sushi.  Let's talk about this sea bean.  First time for me to try and completely not the taste/texture I expected.  I imagined it to be firm and hearty and it was hollow, slight sea salty taste and crispy - very good. More, please!
This was the first dish from Seth of the night. We were perplexed and a little amazed and my FAVORITE of the night.  What is this?  Grilled rice topped with uni (sea urchin) and a very thin slice of house cured "back fat."  Garnished with quail egg and a soy inflused gelatin. Sea urchin has always intimidated me and I wasn't sure I would enjoy it, but I was willing to give anything at try here.  If the thought of "back fat" sounds very unappealing or gross, get over it because it was divine.  The combination was simply perfect, the crispy plain rice with the slight grilled flavor coupled with the saltiness of the uni and the butter richness of the back fat - wow, give me more.  Two servings are really not enough for this girl!
This was a very innovative dish by Seth.  Kimchi grits (who knew such things existed) with tempura fried wasabi leaves sprinkled with bone marrow powder.  While this was my least favorite, I'm glad I had the opportunity to try such a unique dish.  The grit were very cheesy with a kick to them - a tad too cheesy for me - and the crisp-ness of the tempura was good. The bone marrow powder, I tried a little bit on it's own and was not a fan.  However, I had it again on a later dish and it worked so well that I liked it again. Ha! 

This was a sushi trio from Hori-san and another of my favorites for the night. The roll houses salmon and soft shelled crab.  On the closest one in the picture, it is topped with uni and microgreens.  As my second uni tasting of the night, well ever, I loved it.  The middle one is topped with a slice of scallop and very finely grated ginger topped off with a nice sear from a blow torch. My absolute favorite of the three. Delicious.  The right piece is topped with chopped toro and was smooth and butter, also very good.

And here, we have the foie gras! =)  It was rich yet light, buttery and creamy.  It was compacted with uni to give you a mix of flavors.  I think I could eat this for my meal with some crackers and a glass of wine. I HAPPY. On the left is braised unagi on top of season apples and pickled/candied? hibiscus leaves, topped with bone marrow powder.  I am not normally a fan of unagi simply due to it's very fishiness flavor but this was perfect!  The sweetness and the apples was a perfect combination.  If unagi was always served this way, I would be a long time fan.
This was the last dish before dessert and another unique offering by Seth.  Those black rounds are black garlic sasuage - omgosh so good. BUT, even better than that were those light brown nuggets of gnocchi goodness. Of course it's not just a normal gnocchi but he cooked the potatoes with hay so they would be infused with a smokey flavor and aroma. This was combined with edaname sprouts (a first and delicious - very similar to snow bean sprouts), purple carrot, peppers (can't remember what kind) and pickled veggies. We are absolutely stuffed at this point and I desperately wanted to finish eating this, but just couldn't.   
Oops! Here's another sushi trio we had earlier that I missed. The first one is beef tongue (slightly seared with a blow torch) with slivers of pickled ginger.  Very unique but honestly, tasted like beef!  The middle was my favorite - sushi with alaskan king crab - butteriness of the sushi combined with the saltiness of the crab was perfect.  The last one is hamachi with a sliver of jalapeno.  I think this is the first time for me to appreciate hamachi (aka amberjack) and it's firmer than salmon but still fairly butter.  Good kick with the jalapeno.  All three - gone in a few minutes!   

So remember how I mention that we were completely stuffed? Um, that didn't stop us from cleaning the dessert up! We're good eaters!  The is a chocolate cake with three different types of chocolate, or chocolate cubed as our waiter, Blake, referenced.  Very good, not too rich and it was drier than you expect by looking and smelling at it - but drier in a good way.  the middle was my favorite, black seame creme brulee topped with strawberry slices. I love creme brulee to begin with but I do love when you can actually see the vanilla and sesame seeds.  The last is a yuzu (japanese citrus) sorbet. SO refreshing!  I would eat between spoonfuls of the cake and the brulee.  It's light that normal citrus flavors and very airy.

My favorite of the night was the uni, back fat and fried rice. Second place was the foie gras and the third, by barely a thread from second, was the sushi trio of uni, scallop and hamachi. Oh, the alaskan salmon sashimi was divine too... Ah, so many good eatins, hard to rank! Overall, I give this place five stars again. Fantastic!

January 03, 2011

Lobster Linguini

This year, we decided to go the non-traditional route with our dinner and have surf and turf - with the custom hot pot, of course.  I must say, Lobstah, was delicious!  So happy!  I haven't had lobster in a very long time and for a moment, I did wish I didn't have it so in the future, I'd be all sad I can't have it on a daily basis. 

Anyways, we saved all the lobster shells and the next say, I use those shells to make a delicious and flavorful stock for some seafood linguini. Can be a tad time consuming but I think it's well worth it - getting as much as possible outta those expensive ocean critters. 

Sorry for the lack of photos but battery was drained from taking many pictures of my niece and it was charging during this time.

Lobster Linguini
Serves 5

Lobster Stock:
Leftover lobster steam water (use the leftover water you steamed the lobster in)
1-2 cups water
Lobster shells
1 can tomato paste
3 stalks celery cut into large pieces
3 carrots cut into large pieces (no need to pell)
1 onion sliced into quarters
S&P

1. Take the lobster water (if you have any), 1-2 cups water and lobster shells and put into a huge pot.  Add in the tomato paste and all the veggies.  Bring to a boil and then let it simmer on medium for a good 45 minutes.  You want all that lobster goodness to seep out into the stock.

2. Once done, drain the pot and discard all the contents other than the stock.  Put the stock into a smaller pot or the same one, and let it cook a little longer on medium to reduce down.

3. Sister was on a non-dairy diet so I used just a teeny bit of cornstarch to help thicken. I imagine this would be delicious with a tbsp of butter or a dash of cream.

Lobster Linguini
1 pkg linguini
1/4 lb of shrimp, peeled and devined
4 garlic cloves chopped
1-2 roma tomatoes cut into cubes
S&P
Small handful of chopped parsley
Lobster Stock

1. Bring a large pot of water to boil to cook the pasta. Cook pasta according to the directions. I liked the linguini but you can use any other type of pasta. 

2. In your pan with the lobster stock, bring it back up to a boil and quickly cook the shrimp in the stock.  This should only take a few minutes and it doesn't hurt that it also gives more flavor to the stock!

3. In a hot pan big enough to hold the pasta, add olive oil and the minced garlic.  Then add in the tomatoes and let them cook on medium high until they start to fall apart. Next, add in the lobster stock until well blended.  Cook for a few minutes until they are well blended and then add in the shrimp and the pasta.  Give it a good mix and to top it off, add in the parsley.  Enjoy!

January 02, 2011

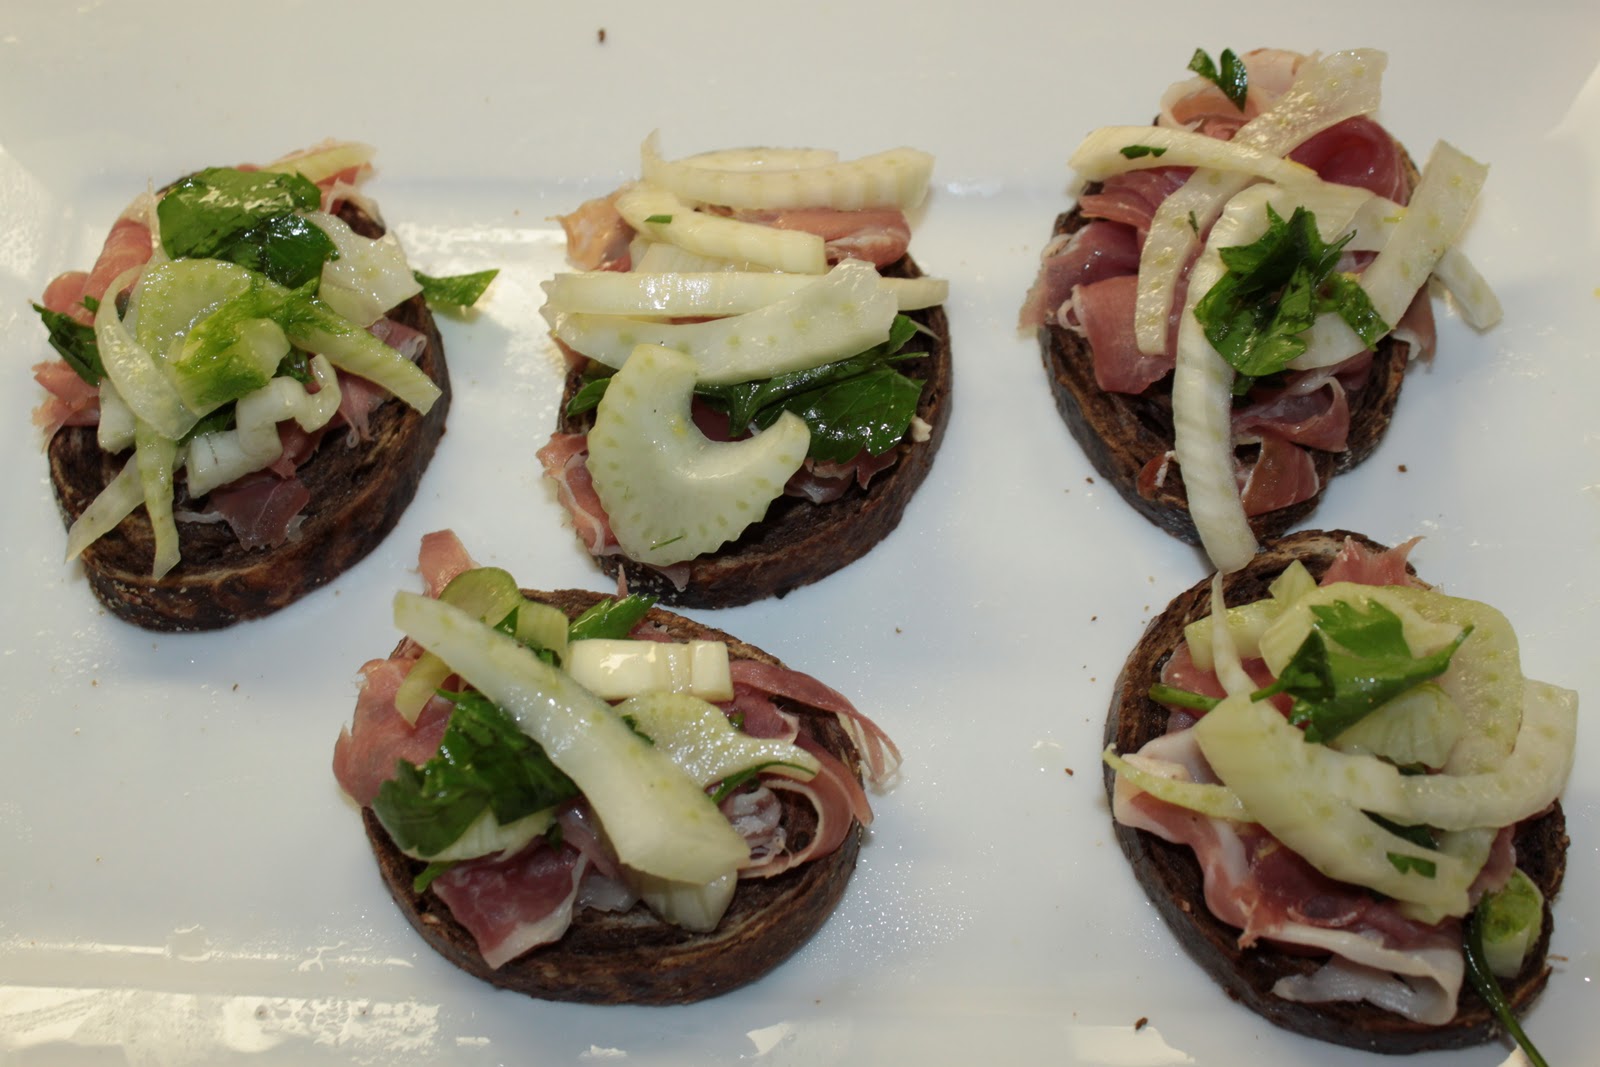
Proscuitto & Fennel on Rye

For Christmas 2010, we spent it up in Southlake at Hilda's and Eric's new home. Beside the food, time was spent cooking, eating, shopping and more importantly, playing with Baby Sophie, who is THE cutest baby ever.

As you can see from my previous post, I'm a little obsessed with fennel having found this new veggie just a few months ago.  This is a very easy appetizer to put together and serve for guests while they wait for the main meal to finish cooking.  I found this recipe on Real Simple and didn't do much to it. 

Proscuitto & Fennel on Rye
Makes about 15
Recipe adapted from Real Simple

1 roll of sliced rye bread (you can use a baguette if you prefer)
3 bulbs of fennel
S&P
1/4 cup olive oil
2 lemon
1 lb sliced proscuitto
1 bunch of parsley

1. Heat oven to 250 degrees. Slightly brush olive oil on the sliced rye bread and let these toast for only a few minutes.

2. Make the fennel salad. Clean and wash the fennel, slice and toss with a lemon vinagrette (look at previous post here to learn how) and the chopped parsley.  You can added freshly grated parmesan cheese but sister is on a no milk diet due to baby's allergies!  This made significantly more than you need for these appetizers but I love having this on the side as well for a light salad. 
3. Now to assemble.  After the rye bread is done toasting, slightly pull apart proscuitto and place a nice pile on top of each slice of bread.  Top this with the fennel salad and then sprinkle just an tiny, tiny amount of S&P. Beware, you can eat several of these so make sure to limit - or you won't be hungry for your real dinner!

January 01, 2011

Crisp Fennel Salad

Well, well.  Happy New Year!  A resolution for 2011 is to provide you with more posts each month - I realized I've slacked these last few months but did you also realize that I've had this blog for more than a year!  Hooray!

So, I discovered fennel from one of my go-to Food Network chefs - Giadda. She's definitley one that I consistently watch, but I do have to say, the way she closes her eyes while she tastes the dish and does that mmmm-MMMM sound, makes me cringe and like her just a little less. So annoying! Ha! Her dishes are fairly good, not too complicated but beware some are hit and miss. 

Back to fennel.  It's a crisp, sweet, licorice-ish flavor veggie.  It's an odd looking thing with the bulb and several stalks that are typically tossed.  For me, it was one of those intimidating veggies that I saw in the store, wasn't sure how to cook or eat it and so just kept walking to the cauliflower and broccoli.  After seeing Giadda and Ina use fennel various ways, I thought to give it a whirl.  Baby steps, though!  Make it into a raw salad with a simple lemon vinagrette and wow, I love this salad and I love fennel!  Now, if it wasn't so expensive I think I'd be inclined to eat this at every meal.  A fennel bulb will cost around $3-$4 and two will feed one person.  If you're making for several, you'll need about 5 bulbs. 

As for the stalks, you are suppose to cut the tips and discard. I've tried grilling/sauteeing them and they are edible.  Also, my dad pulled back the outside, fiberous layer (like a banana) and the inside veggie meat was quite delicious.  Just takes a little work.  Also, for plating, save a few of the leaves for garnish to add a nice touch.

Crisp Fennel Salad
Serves 1

2 bulbs fennel (bulbs only)
S&P
1 lemon
1/4 cup olive oil
Handful of arugula
Freshy grated parmesan cheese

1. Wash the fennel well as it can be quite sandy.  I cut the bulb right where the green stalks start to protrude.  Then cut the end off too - where it's a tad tough.  Then half it vertically as shown below.  I don't cut out the core which some may tell you to.  It's a little harder but still edible in my opinion.  Then slice them up!
2. In a small bowl, grate the lemon zest then juice the entire lemon.  Add a good pinch of salt and pepper.  Then with a fork, whisk in olive oil until it creates a yummy vinagrette.  Keep tasting until it's just right - adding S&P as needed.  
3. In a bowl, toss the arugula, fennel and the dressing.  Once incorporated, add in the freshly grated cheese, taste and add more S&P as necessary.  Done!  I also grilled a tomato to complement this salad and yum!

December 13, 2010

Chicken Wrapped in Proscuitto

I am particular with my Food Network shows and cooks, and unfortunately, Rachael Ray, is a victim of the pass by click of the remote control.  I'm sure her dishes are fantastic, but I just can't sit through an entire episode.  I'm also not going to into why. =)  Regardless, this is one of her recipes that I found online and it turned out pretty well.  It could use a few more tweaks but still pretty tasty for a first time recipe.

I have an abundance of rosemary and need to find ways to use it before the cold (whenever it comes in Houston) takes it away.  Holy, the many uses for rosemary.  I've used it with steak, with butternut squash, with chicken, with salad dressing, and on and on.  This dish combines the best of three things I'm loving - chicken thighs (hooray! for dark meat), rosemary and proscuitto (hooray! for proscuitto). 
  
I also made this for Hilda and Eric but cooked by quickly searing and then popping in the oven.  I don't think I have a preference on using the pan vs. oven.  I probably prefer to just use one so not to have to hassle with both.  Both tasted similar.  Again, I'll probably tweak this the next time I make it - use orange zest and juice instead of the olive oil, use different herbs (probably just as good with fresh thyme or oregano which I have now thanks to my friend Liz! Look at that trio of fresh herbs!), who knows, so many different ways to tweak! 

Chicken Wrapped in Proscuitto
Recipe adapted from Rachael Ray

4 chicken thighs, boneless
8 sprigs of rosemary (half minced and half whole leaves)
5 garlic cloves, half minced, halfed sliced
4 slices of proscuitto
1 lemon (zest and juice)
1/8 cup of olive oil
1/4 cup chicken broth (you may need more based on your preference)
Dash of dried oregano
Dash of garlic powder
S&P

1. Make sure to wash and dry the chicken thighs. Cut off those excess fat pockets on the thighs. S&P each of the thighs.

2. In a bowl large enough to hold the all the chicken, pour the olive oil, minced garlic and sliced garlic, minced rosemary, oregano, garlic powder, lemon zest and juice. Mix well, add the chicken and coat each side of the thighs.  Let this sit for about 15 minutes.
3. Take the proscuitto out and lay each of the four slices on a board. Take a thigh and put a bunch of rosemary leaves, garlic slices in the middle, wrap up in a roll (as much as you can), and wrap the proscuitto around it.  4. In a medium high pan, sear each side of the chicken.  Don't worry if the middle is not cooked, you just want that crispy proscuitto.  Once seared, add in the chicken broth and cover the pan.  Let it steam cook until done.  

December 08, 2010

Thanksgiving 2010 Part 3: Orange Green Beans

Green beans are a staple at every holiday meal. We've gone through our fair share of variations: canned green beans with cream of mushroom soup, with and without those delicious crispy fried onions, fresh green beans with simple garlic, oil and S&P, to roasted green beans. One year, I made green beans with orange rinds and while it was good, it didn't absorb the orange flavoring as much as I would have like. This year, I tried to cut the rinds smaller and crushed them a little more to really get that orange flavor and I think it worked. 

While I'm a fan of canned food and veggies (my pantry is consistently stocked with canned corn and numerous canned tomatoes), I think this dish is best made with fresh green beans and during the holidays, these are bountiful and reasonably priced.  - 1.29 a lb, yes please!

Orange Green Beans
1-2 lbs of fresh green beans, clipped and washed
2 tbsp butter
1 small handful of chopped bacon
3 cloves of garlic, sliced thin
Rind from one small to medium orange, sliced into strips
Juice and orange segments from that same orange
1/3 cup of broth and white wine (whatever portion you would like)
S&P

1. Make sure your green beans are cleaned and washed.  
2. Get all the bacon, garlic (in the pic below, only the rinds and everything on the right is for this dish.  Trust me, not using all that bacon!) and orange rind ready before you turn on the heat.

3. Add butter to a pan big enough to eventually hold the green beans and liquid. Add in the bacon and let it cook to ooze out that bacon goodness. Then add in the garlic, orange rinds and let those flavors mix togehter.  Yum! 
4. Add in the green beans, orange segments and juice. Give it a good mix. Add in a dash of S&P (a little less on the salt since you do have bacon).
5. Turn the heat down to medium low and pour in the 1/3 cup of liquid. Cover and let this steam/cook for about 3 minutes. Then take the cover off and let it cook for another 3 minutes. Do a quick taste test and add more S&P as necessary.  If you had garlic powder, I'm sure a dash of that would be delicious too!

6.  It's nice if you let it sit a little bit so the flavors are really absorbed into the green beans.  I made this an hour before dinner started, took about 10 minutes start to finish and let it sit the remaining time. Enjoy!