June 24, 2011

Magnifique French Onion Soup

It wasn't until college that I started to enjoy and freely choose to order french onion soup. First of all, I don't generally like onions and only like cooked onions - but cooked for a long period of time until they become soft and sweet.  Also, when given the option between creamy tomato basil soup, chicken and dumplings or french onion soup, the latter always seems to receive the short end of the stick. But, really, who can pass up tomato basil soup?

As for why I tried to make this soup for the first time, I'm not entirely sure. First of all, it's summer. In Houston. It's hot. Ridicously hot. The thought of hot soup isn't really that appealing.  However, I think I had one of those random cravings that if you don't have it or anything similar, you will continue to think about it until you satisfy it. Well, there's nothing similar to french onion soup! 

This soup was easy and didn't require any extra trips to the store since these are basic pantry items, a big score! It does take some time - roughly 45 minutes but it's not continuous cooking time.  For a good chunk of the time, it's leaving the soup to simmer or the onions to slowly cook down.
French Onion Soup
Recipe adapted from here


3 large yellow onions, sliced
1/2 stick of unsalted butter
2 bay leaves
1 tbsp cornstarch
1 cup sherry
1 cup white wine
5 cups beef stock
Salt
White pepper
Parmesan cheese, grated
2 slices of toast
1. Clean your onions, ridding of the exterior skin. To slice them, I cut them in half and then slice into strips. 
2. In a pot large enough to hold the stock, add your butter except 1/4 tbsp and when it's halfway melted, add your onions. Let this cook on medium heat for a good 20-30 minutes until they get sparkley and dark brown. The heat is important here. If you have it too high, your onions will cook too quickly and mine tend to burn without getting to that soft, clear, carmelize-y state.
3.  Starting to look good!  Add in the bay leaves.
3. Next, add in the sherry. Sherry has a very distinct flavor. If you do not like it, cut back on the amount and you can add either more wine or beef broth.  Scrap the pan to get all the bits off the bottom.
4. Next, add in the cornstarch and give it a good mix so that the onions are coated well. 

5. Now, add in the wine and beef stock. Give it a taste, then add in salt and pepper as you see fit. White pepper works really well for this recipe.  Turn up the heat until it boils and let it boil for 5 minutes.
6. Turn up the heat until it boils and let it boil for 5 minutes. Then turn the heat back down to a simmer and let it sit for a good 15 minutes. Add in that last bit of butter to let it melt. Again, taste and add salt and pepper as necessary.
7. Turn on your broiler to low.  Put the number of ramekins you'd like to serve in a larger pan - so that it doesn't get your oven dirty if it overflows.  Pour ladels of soup into each leaving just a little bit at the top to fit your bread and cheese. 
8. I used normal white bread and tore them into pieces to loosely cover the top.  Add grated parmesan cheese on top. I'm sure you can use any type - french bread for a crisper topping.  I put them under the broiler on low for 3-5 minutes. Make sure you watch so that the chees doesn't burn.  Be careful taking this out. I served the ramekin on another plate so not to burn any fingers. Enjoy!

June 07, 2011

Hello My Precious!


No real recipe or restaurant review today, but I simply had to share my excitement of my first tomato plant and the subsequent tomatoes. Oh, look how pretty they are!  How proud I am!

How to eat the first pick? Simple and plain. No seasoning, not fancy smancy preparation. I simply wanted to relish in that first taste of fresh, sweet tomato yummy goodness.
For some reason, I can't bear to cook them and would rather eat them simply sliced. Sliced, sprinkled with a little bit of sea salt, quick spray of some basil infused olive oil and a few fresh basil leaves - also from my garden!

Perfect salad before dinner - or in my case, a great afternoon snack!  

May 24, 2011

Restaurant Review: Toyama Sushi

"Oh look, there's a new restaurant. I wonder if it is good. We should go sometime."  Then we typically forget about it. As such, this conversation with Ross probably happened a good 5-8 times every time we drove by Toyama on Shepard but we finally tried it!  Walking in, the restaurant features clean designs, bright colors and several areas for seating - booths, tables and a modestly sized bar. I have to admit, I automatically cringed just a wee bit wondering if this was going to be a Zake or a Ra where they start playing club music to make it a little more hip, but no fear, it wasn't. 


As we looked at the menu, we immediately commented that the menu is glaringly similar to our favorite sushi restaurant, Osaka, on Westheimer. The waiter informed us that they are sister restaurants - queue my big smile and soon to be happy stomach.  

Owned by Shirley Li, who also owns Osaka, Toyama is a nice surprise. It is apparently named after a small town close to Osaka and as I write this, I actually remember my family trip to Japan several years ago where we actually visited this city - touring the castle museum and a sake brewery =).  

As for the sushi, the quality of the fish tastes fresh, sushi roll options are varied but without any fuss and the prices are very reasonable. They also had a 50 percent off sushi and rolls when we went on a late Saturday afternoon.  However, I do have the say that the quality at Osaka is just a little bit better. When we have the salmon sashimi at Osaka, it is like butter and we have a little sigh of happiness. At Toyama, it just didn't seem to be on the same level but I give it leeway as it's a fairly new restaurant.


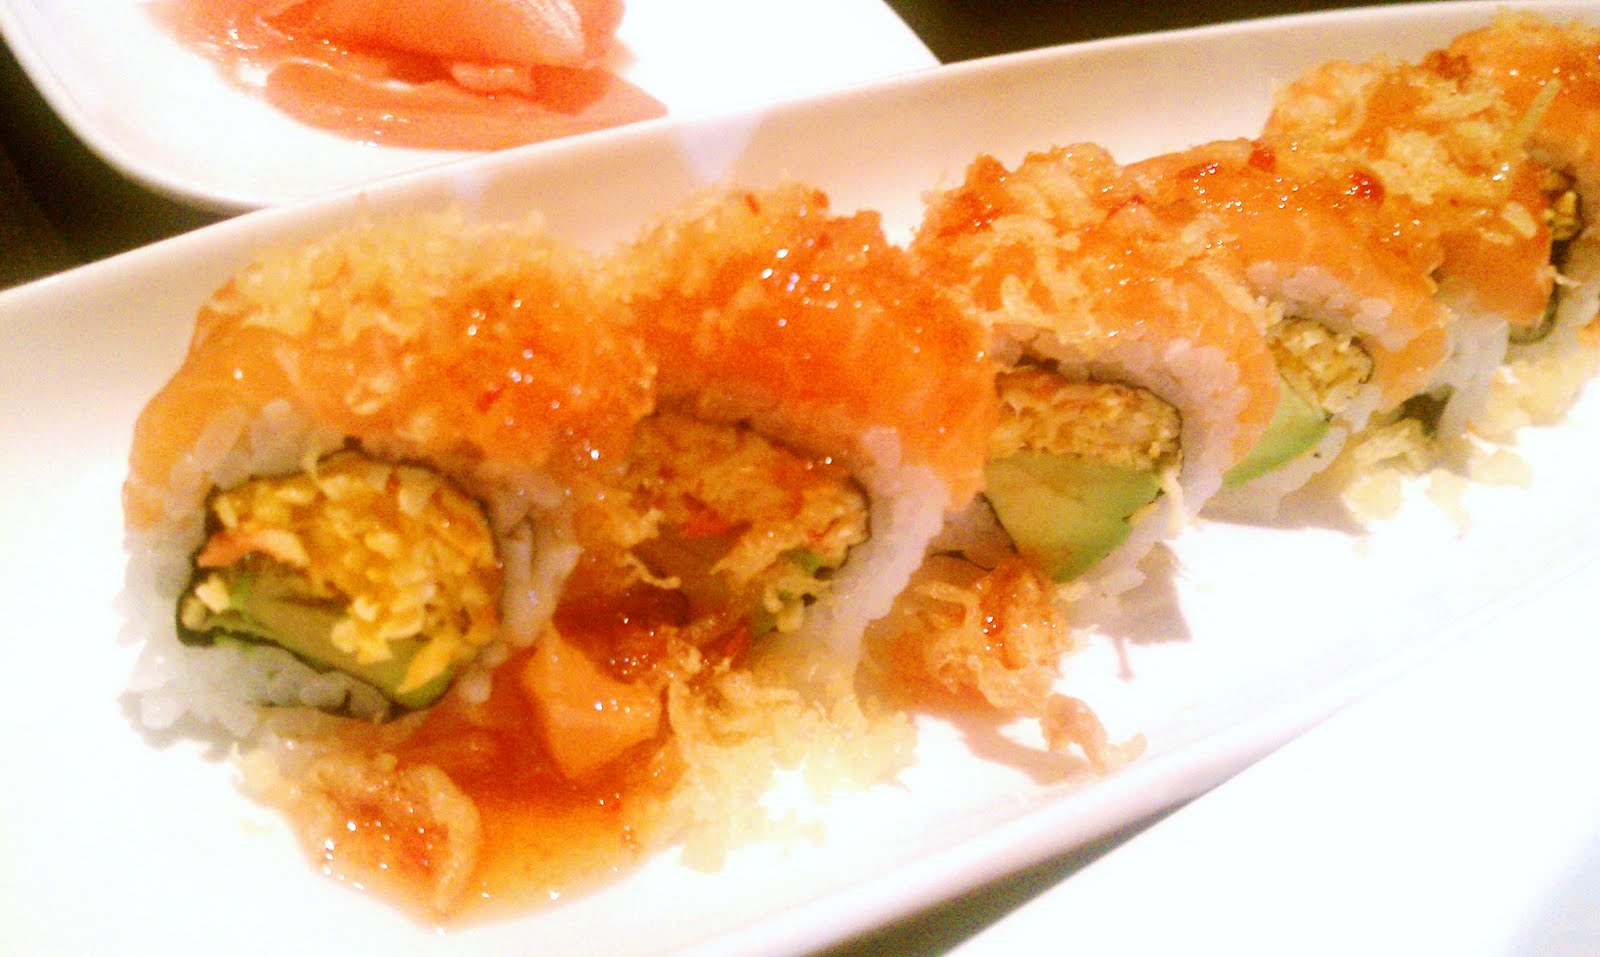
Here's what was on our menu. The first is a chopped scallop roll - very simple, to the point, no embellishments. One of my favorites simply because I love chopped scallop so much but if you are really want the best chopped scallop that I've tried in town thus far, go to Miyakos.  We also had a roll that was the other favorite of the meal - white fish sushi roll with seared tuna and strawberry. I was surprised by the fresh, bright flavor the slice of strawberry added to this roll and how well it complemented the fish. The crab roll topped with fresh salmon and crunch was also good but out of everything we tried, probably our least favorite. Simply good but nothing spectacular.


Oh, and the added perk of Toyama? Following the tradition at Osaka, we received a complementary appetizer and ice cream with fried banana dessert.  Yes, please!  Overall, the restaurant is a great alternative to Osaka if you are looking for a much less expensive meal, especially if you go during their happy hour.  Service is quite good and they refilled our drinks and cleared our empty plates often.  My only qualm I have is their location and most specifically, their parking lot which I think literally only fits 5-8 cars. You'll most likely end up having to park in the neighborhood and walk to the restaurant.  We've been two additional times since our first visit and we leave with pretty happy stomachs. Check out Toyama or Osaka when you have the chance.  I'm always open to other sushi restaurants so please share!


Toyama
2802 S Shepherd Dr
Houston, TX 77098

Osaka
515 Westheimer Rd
Houston, TX 77006


May 19, 2011

Easy Creamy Chicken Piccata

My brother-in-law made this dish for me when I stayed with them. He's taught me a few other dishes so it's fitting that I call him Chef Alcaraz. So, what makes this dish?  Definitely the crispy crust and the oh my, oh my, the lemon-y butter-y sauce goodness. This is the type of sauce that you want to pour over everything you have on your plate - broccoli, rice, pasta, whatever. Trust me, it will taste better with this sauce.

Chef Alcaraz made it with chicken breast but I used what I had in my freezer - boneless chicken thighs and it was just as good. I changed it up by using panko crumbs to give it a crunchier bite to the dish and of course, I used cream. Like this sauce, cream makes everything better, smoother and silkier. 

A key thing to note for this is that you should cook your meat on medium heat, not high. If you cook on high, your meat will cook on the outside too fast and start burning before the middle is cooked. When you realize how easy this dish is to make, you'll cringe a little that you've ever spent the $10 plus dollars on this same dish in a restaurant. 

Creamy Chicken Piccata
Adapted from this recipe
Serves 4

4 boneless chicken thighs
1/2 cup flour
1/2 cup panko crumbs
1/2 cup chicken stock
1/3 cup capers
3 tbsp butter
3 tbsp olive oil
1/3 cup cream
1/3 cup fresh lemon juice
Zest from one lemon
Handful of chopped parsley

1. On a clean plate, put the flour and panko crumbs.  Make sure your chicken thighs are washed and thoroughly dried with paper towels. If you find that your thighs vary signficantly in thickness, flatten them out between two sheets of plastic wrap or wax paper.  This helps ensure your meat cooks evenly.

2. Take the dry chicken and evenly coat each piece. 
3. In a pan on medium, heat up the olive oil and 2 tbsp of butter.
4. Cook one side of the chicken for about 5-6 minutes.  Flip the chicken and cook for another 5-6 minutes until crispy and golden brown.

5. Remove the chicken from the pan. There should be plenty of butter and chicken bits left.  If not, you can add in a few extra tbsp of butter or you can do what I do and add in cream. :) Add in the lemon juice, zest, stock and capers. 

6. Once the liquids blend together and you have scraped up the bits of chicken and incorporated into the sauce, add the chicken back into the pan and add in one final tbsp of butter.
7. Remove to serving platter, making sure to add all the sauce and sprinkle the top with chopped parsley.  This is best served with linguine with simple herbs, S&P and olive oil - and even better when you add some of this sauce!  I had leftover rice and that worked well too.

May 16, 2011

So Fresh Edamame Salad

This is a dish I discovered several years ago during a Central Market cooking class. In that class, this salad was served alongside grilled lamb chops. It's such a simple and incredibly fast dish that I love making it when I'm in a bind and need a somewhat healthy lunch. 

I feel like edamame has really taken off in the past few years and is now a much more common snack. It's no longer just the soybeans you have in a japanese restaurants. You find it now incorporated into a variety of non-Japanese food now. 

I typically buy the frozen edamame from the asian grocery store. Nowadays, you can find this in almost any store.  I have found that I prefer the edamame that are still in the pods versus the ones that are already shelled. I feel like the unshelled beans taste firmer and fresher. Just my preference but it does mean it takes a little longer to shell each one. 

Edamame Salad
Serves 3

1 package soy beans / edamame
5 radishes, sliced
1 large shallot, minced
Zest of one lemon
6 slices of prosciutto, sliced in similar size as the radish
1 tsp Dijon mustard
3 tbsp champagne vinegar
3 tbsp olive oil
Juice from one lemon
S&P

1. If you have frozen edamame, boil water and then briefly soak the edamame. Shell so you have individual beans.
2. Make sure you thoroughly wash the radish. Slice approximately five radishes into thin slivers.  
3. Mince the shallots. Taking about six slices of proscuitto, I rolled it and slice into slivers. Then take a rough chop so they are smaller pieces. Add to the soy beans. 
4. In a small bowl, mix the mustard, champagne vinegar, olive oil, salt and pepper. Whisk well.
5. Toss the dressing with the salad. Take a quick taste and add S&P as needed. If you need more acidity, add more lemon. I have a tendency to always add an additional splash of vinegar.

May 13, 2011

Party In Your Mouth: Strawberry Cupcakes

I can't resist the overwhelmingly large containers of fresh fruit at Costco. With strawberry season in full force, how can you resist the 8lb container? Not me! However, I can only snack on so many strawberries - plain, with a little sugar sprinkled on top or dipped in nutella - before the freshness starts to decline. 

I found some very odd, unique takes to dishes using strawberries, such as this strawberry risotto. Not tempting enough to make but still very interesting indeed.  Maybe one day I will venture out and try this....maybe. 

I had a cupcake craving several weeks ago and ended up going to the grocery store to buy some.  They weren't great and didn't satisfy my craving one bit.  This was my opportunity and hooray, it was great!  Using fresh strawberries definitely added an additional level of flavor - the bites of baked strawberries in the cupcakes with the combination of the fresh strawberries in the frosting worked well together.  I don't like overly sweet cupcakes so these cupcakes were perfect. If you like sweeter cupcakes, you can add more sugar - maybe 1/2 cup more or added more sugar to the frosting.  I also made a small batch of mango cupcakes and they were just as good. They made the batter a little more moist and you can probably cut down on the sugar as the mangos I had were incredibly sweet.  Sorry, no pictures of the mango cupcakes.

Strawberry Cupcakes
Makes approximately 36 cupcakes

1 3/4 sticks of unsalted butter
1.5 cups sugar
5 eggs
Zest from two lemons
1 cup sour cream
3 cups cake flour
1 tsp baking soda
2 tsp vanilla extract
1 tsp salt
2.5 cups diced strawberries
1. Heat oven to 350 degrees.
2. Make sure your butter is room temperature. I like to take mine out at least a half day in advance so it is perfectly creamy when you mix. In your mixer, cream butter and sugar on high for about 2 minute.  
3. For the eggs, I like to bring them out about an hour prior to baking.  Crack into a bowl to make sure you don’t get a bad egg in your batter or any shells.  Add one egg at a time to the sugar butter mixture while it is on medium high. Make sure to stop and scrape down the sides to make sure it is evenly mixed.  
Don't worry if it looks a little curdled. Keep mixing and it will smooth out.  
4. Add the sour cream and vanilla.  You can cut down on the vanilla but I have a tendency to almost always double the amount because I love the hint of flavor it provides. Let this mix on medium slow.  

5. Next, add the lemon zest.  

6. In another bowl, mix together the cake flour, salt and baking soda. You can use unbleached flour if you do not have cake flour. With cake flour, I find that it is just a little lighter and you end up coming out with less dense cupcakes. Add the flour to the mixer in three portions – making sure to turn off the mixture when you add or you’ll have a nice sprinkle of flour on your face and clothes.  

7. Add in the diced strawberries with a spatula and/or fork.
8. With your cupcake pan all nice and lined, use an ice cream scoop and fill each cupcake liner about 3/4th of the way.  
 (I made mini cupcakes too.)
9. Bake for 20-25 minutes. I put my timer at 18 minutes just in case your oven cooks a little faster. My total time in the oven was 22 minutes.

Meringue cupcake frosting

2 egg whites
1 tsp vanilla extract
½ cup sugar
1 stick butter
1 cup diced strawberries


1. With a small bowl set over a pot of simmering water on the stove, beat the egg whites and sugar with a hand mixer until it doubles in size and becomes a little frothy.  You want to make sure the sugar is dissolved.  
2. Pour the mixture into your electric mixer with a whisk attachment (you can probably still use the hand mixer if you’d like) and set it on medium high. Start adding the butter 1 tbsp at a time until it becomes light and creamy. Add in the vanilla extract. 
3. With a spatula, fold in the strawberries into the frosting mixture.  Spread a little bit onto each cupcake and enjoy!